The knowledge pooling tool is a platform for collecting, curating, and sharing structured information about research activities, outputs, and contributors across TRR379 projects and institutions.
The following workflows provide step-by-step guidance for submitting specific record types to the pool, but note that many of the steps are transferable to other record types:
Read the disclaimer, and if you agree, select “Authorize Application”.
A checkmark will appear on to the “Login” (human silhouette) button if you were successfully logged in.
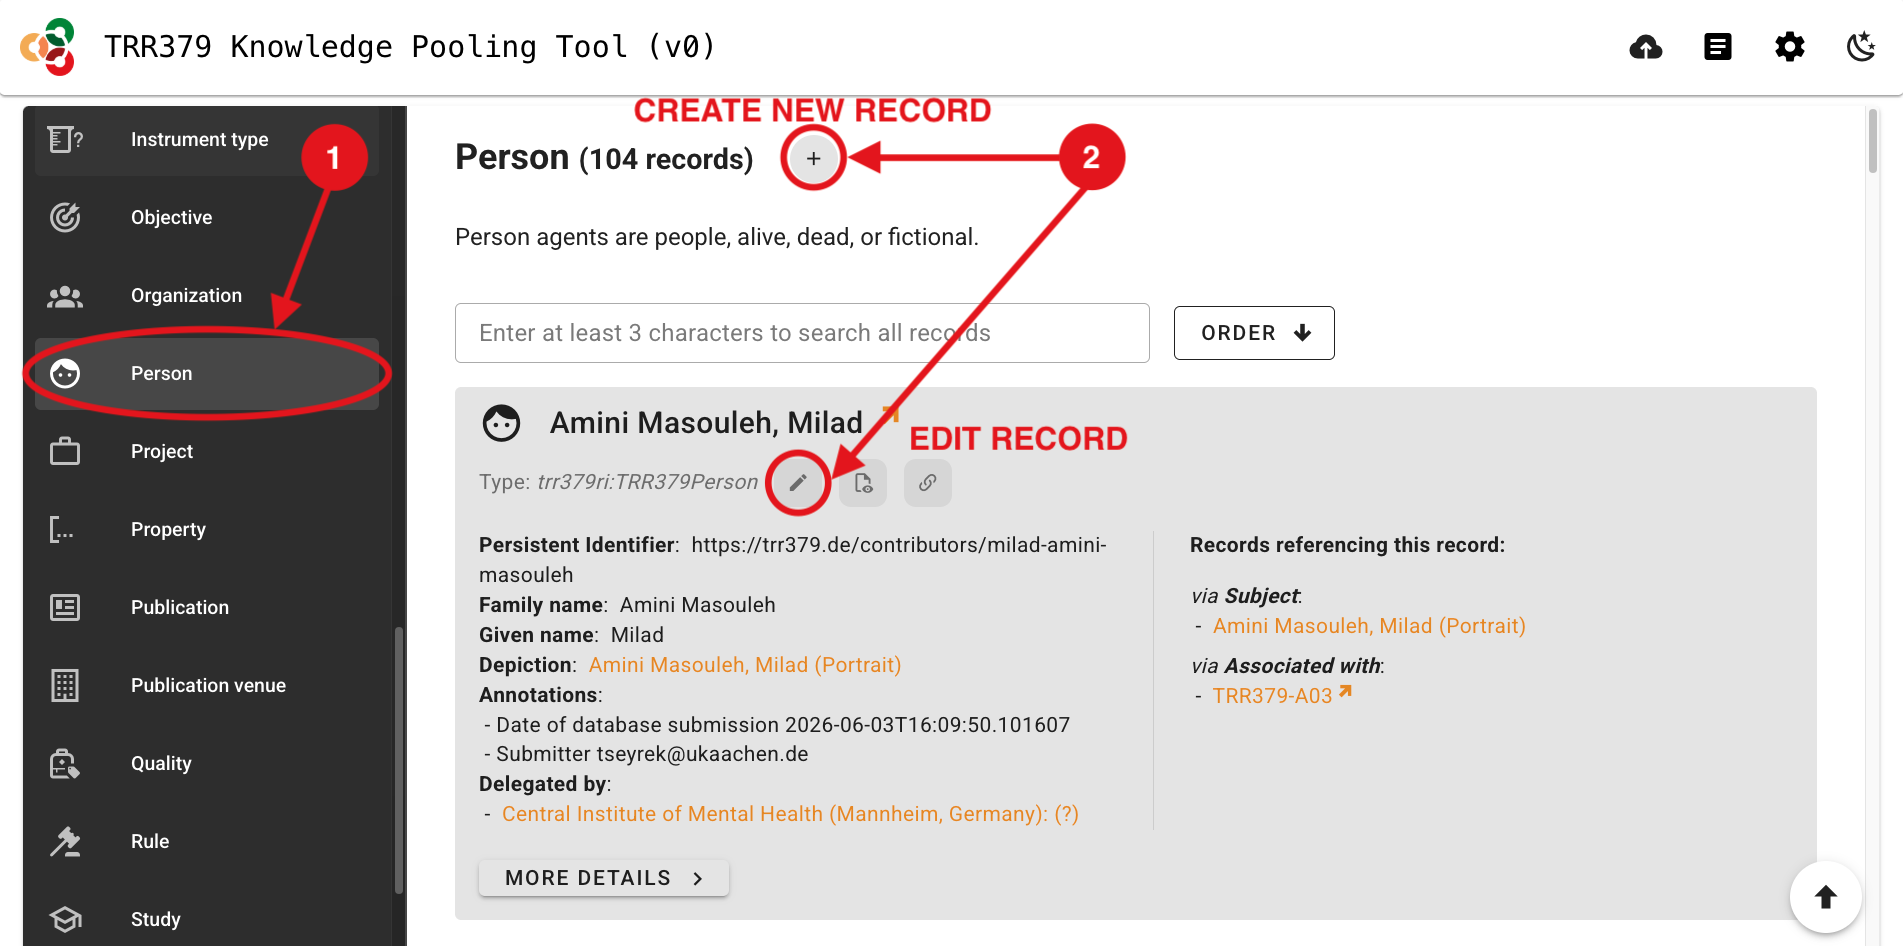
Select the “Person” Data Type on the left side of the page.
Create a new record by clicking the + (plus) button, or edit an existing record by clicking the pencil icon.
To add a portrait photo, click the “Upload a depiction” Wizard button (person silhouette icon). Click the file attachment button (paperclip icon), and select the portrait image with your file browser. Wait for the green checkmark confirmation of a successful upload, and then click “SAVE”.
Important
Image requirements:
Contributor portraits: maximum 400 pixels wide
Page thumbnails: minimum 320 by 240 pixels, aspect ratio 4:3
A single image can serve as both portrait and thumbnail if the face is centered
Proceed to add relevant information to complete your contributor profile as follows:
ORCID identifier
Within the “Identifiers” box, select “ADD NEW ITEM” and then “ORCID” from the dropdown menu.
Under “Notation”, enter your ORCID in the format “XXXX-XXXX-XXXX-XXXX”.
Under “Creator”, start typing “ORCID” and select the “ORCID” organization when it appears in the dropdown menu.
Click “SAVE” in the top-right corner to save the ORCID record.
Description
Within the “Description” box, type a short biography, which can include (but is not limited to) information such as your affiliation(s), professional expertise/interests, and your role within TRR379.
The “Description” field supports Markdown formatting. To preview how your description will render, select the small Markdown logo (capital “M” with a downward-facing arrow) to enter the Markdown editor.
Name(s)
Enter the relevant family name(s), given name(s), honorifics, etc. in the respective text boxes.
Affiliation(s)
Within the “Delegated by” box, select “Organization” from the dropdown menu.
A new box will appear just below “Organization”. Search for your affiliated organization by starting to type its name, and select the appropriate organization when it appears in the dropdown menu.
TIP: Organizations might exist in the pool in a language different to what you are searching for, or might not be searchable based on their abbreviations. Try searching keywords in the organization name that do not translate in different languages before adding a new organization. For example, you may want to search “Jülich” instead of “Research Centre Jülich”, “Forschungszentrum Jülich”, or “FZJ”.
To add additional affiliations, select the + (plus) button to the right of the “Delegated by” boxes.
Once all relevant information has been entered, click “SAVE” in the top-right corner to save the Person record.
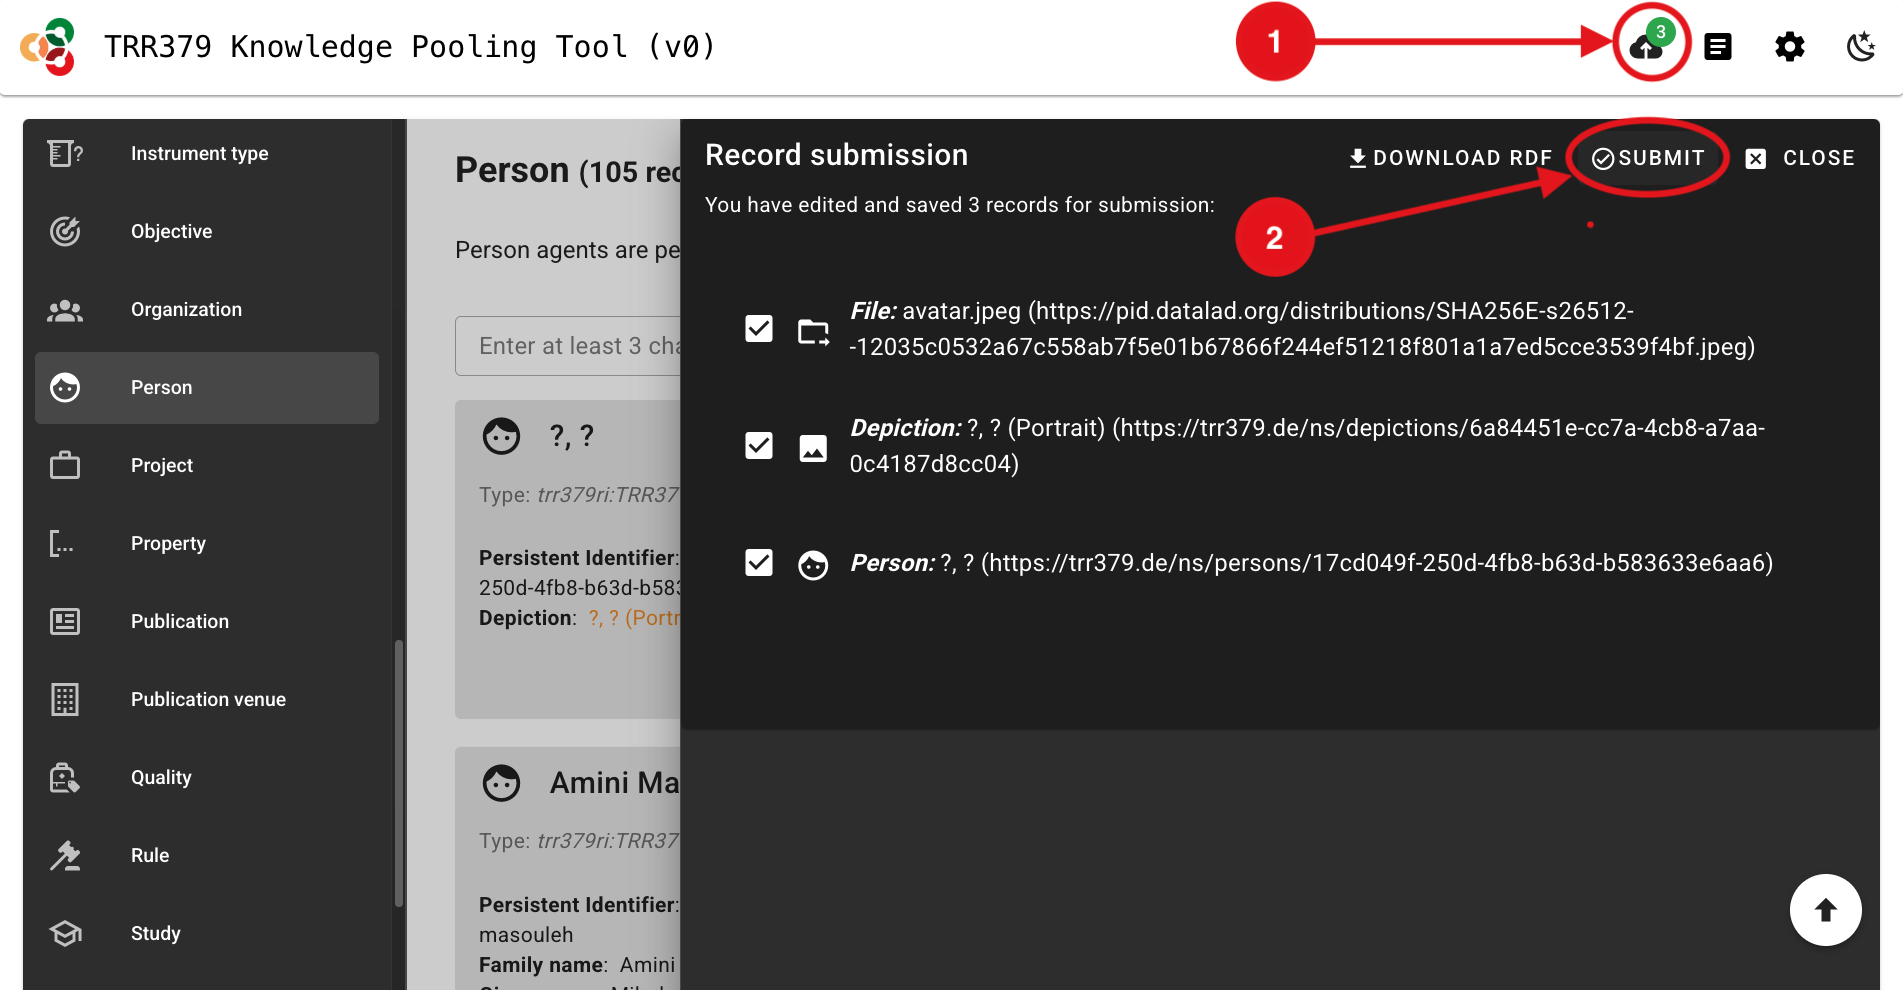
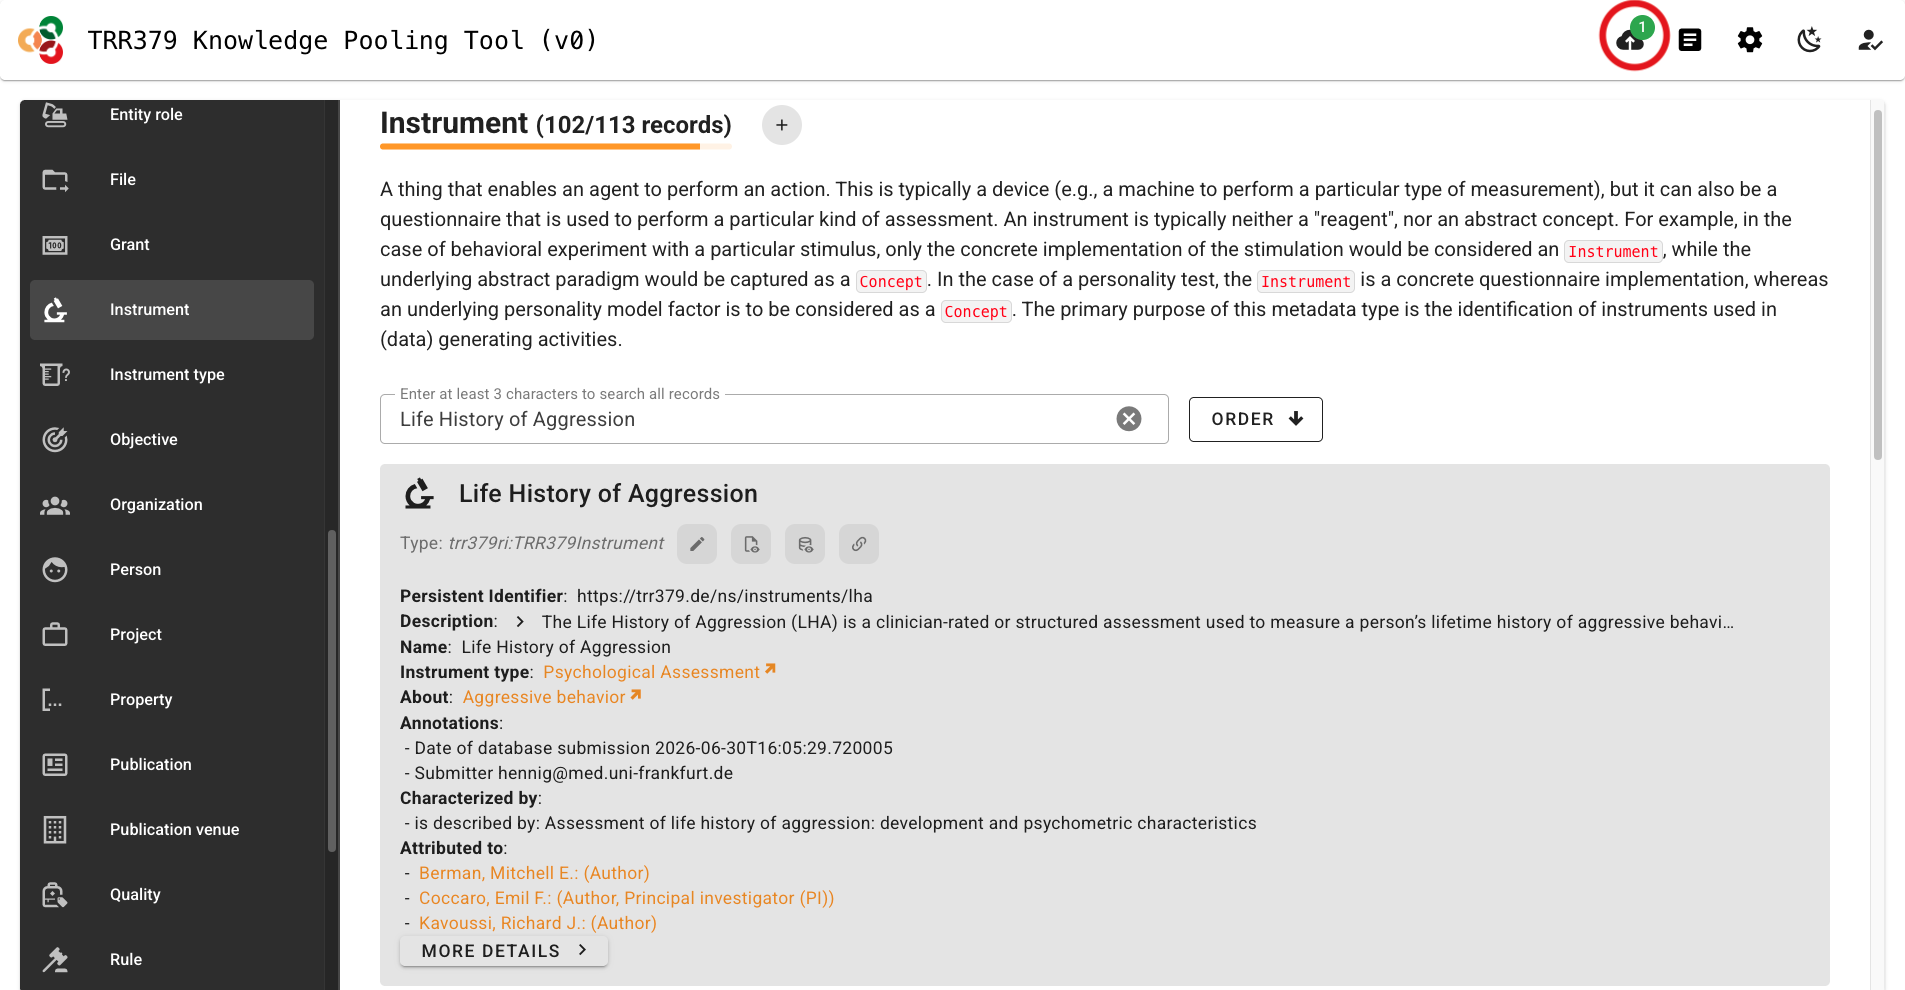
Click the “Submit” button (cloud icon, top-right), which should show a green notification dot to indicate changes are ready to be submitted.
Important note about saving versus submitting
The pool has two separate actions: saving and submitting.
Saving stores your work in the browser only!
It does notsubmit the record to the server for use by the consortium workflows.
To submit, click the Submit button (cloud icon, top-right corner) when there is a green notification dot indicating records are ready for submission.
Do not close your browser tab before submitting, or your data will be lost.
The interface will list all records you are about to submit. For a contributor profile with a profile photo, you should see three records: a File, a Depiction, and a Person.
Click “Submit”. A confirmation message will appear when submission is successful. If an error occurs, note the message and retry. If it persists, you may wish to review common error messages or reach out for help via the resources on the Support page.
Report publications
Note
Every member is responsible for submitting their own publications. Do not wait for someone else to add your work. If a publication is not in the pool, it will not appear in the consortium publication overview on the website.
Read the disclaimer, and if you agree, select “Authorize Application”.
A checkmark will appear on to the “Login” (human silhouette) button if you were successfully logged in.
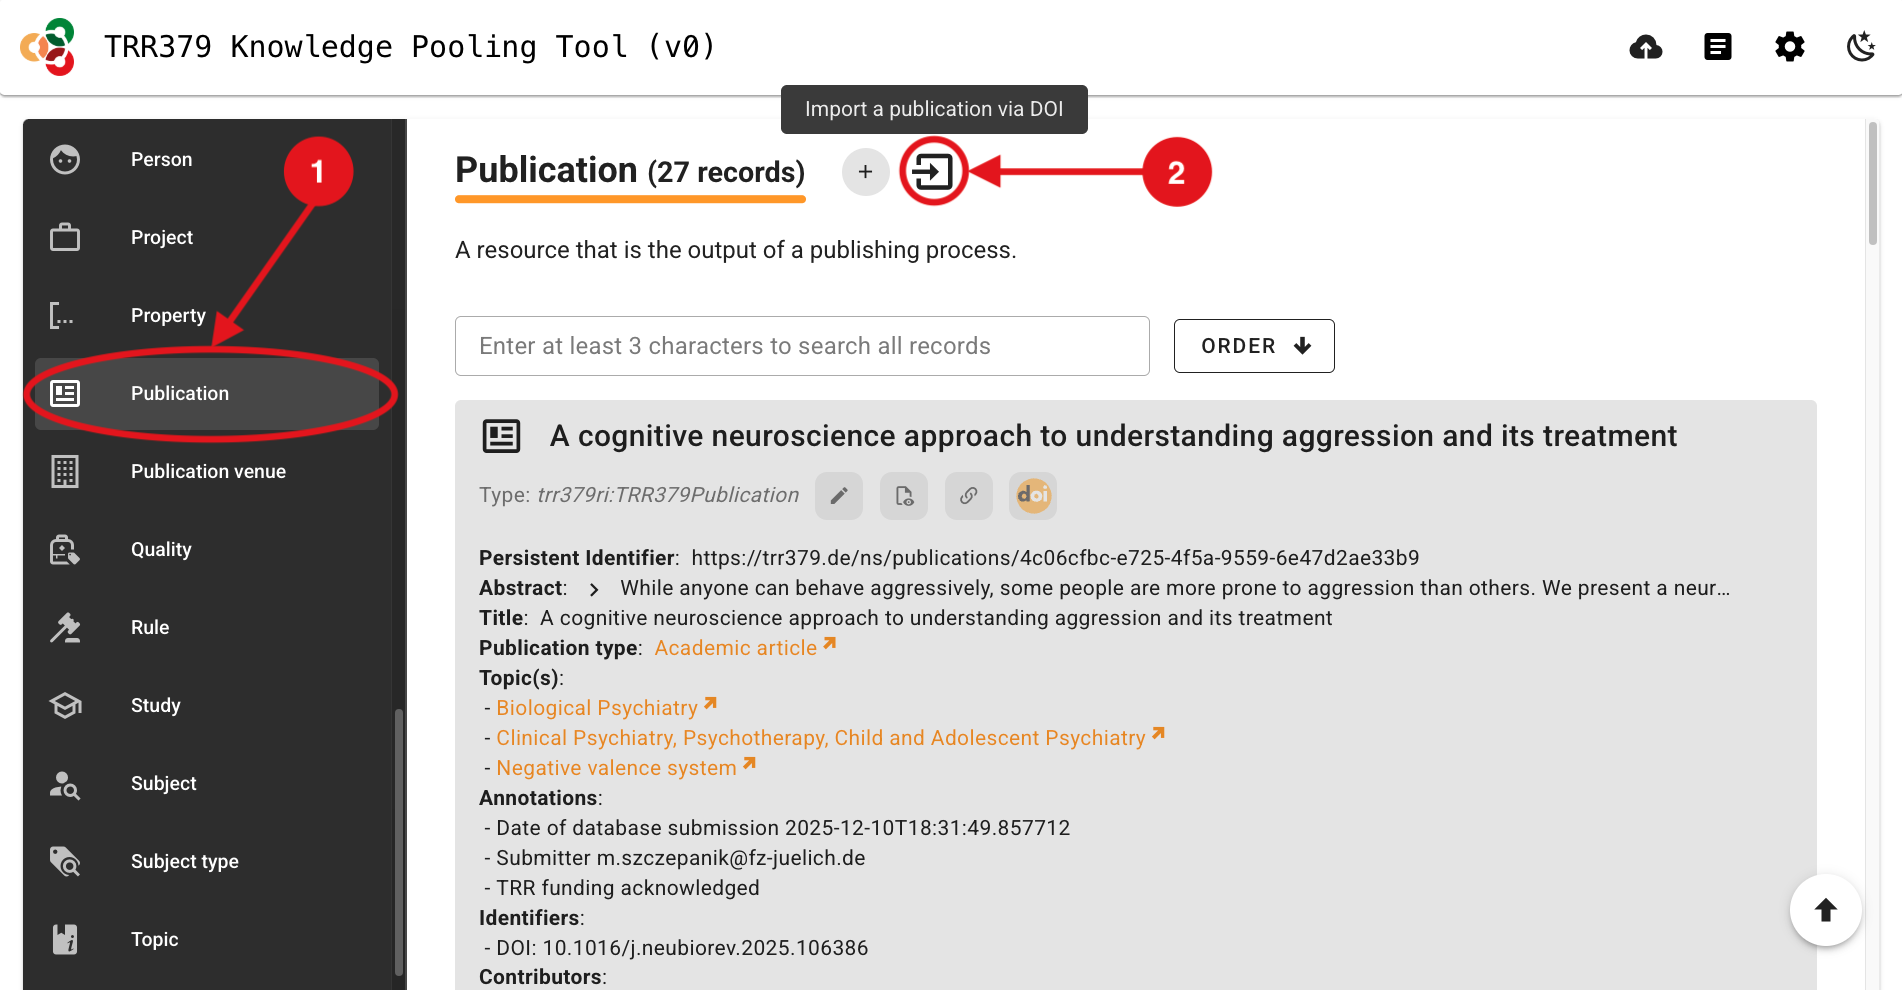
Select the “Publication” Data Type on the left side of the page.
Select the “Import a publication via DOI” button (square icon with right-facing arrow, just to the right of the + plus button).
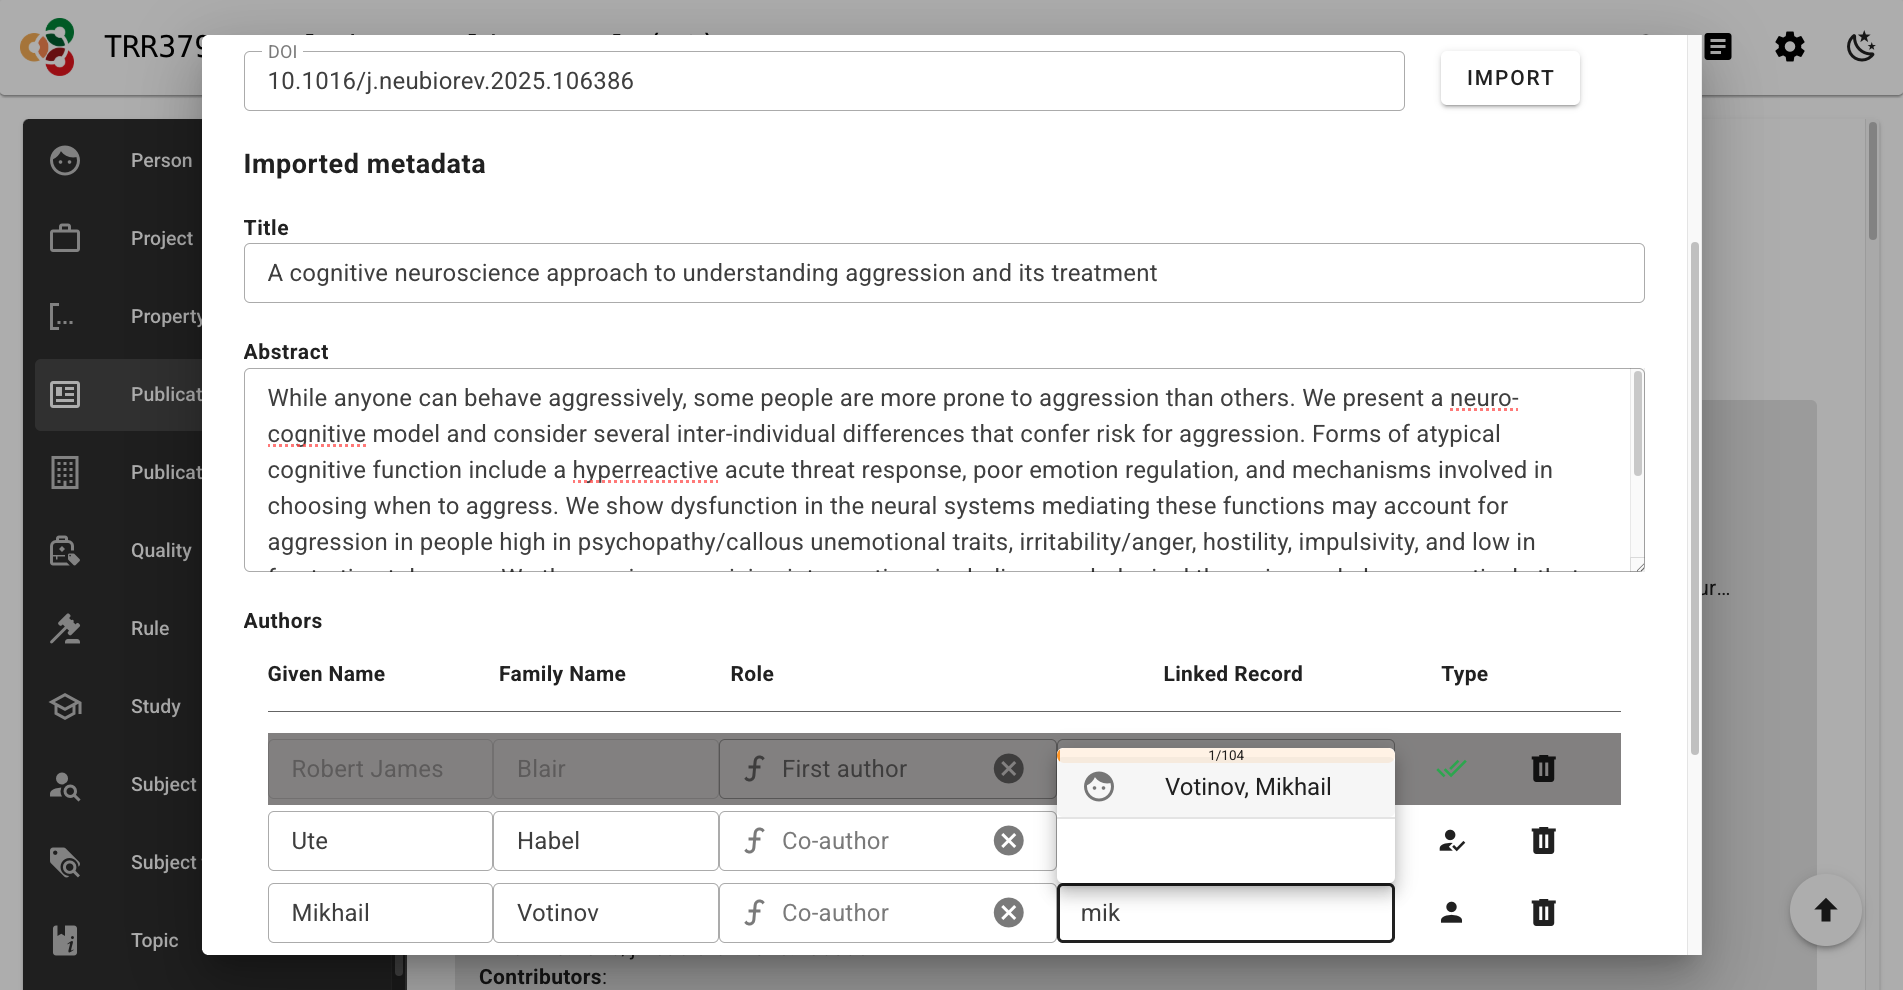
Enter the DOI, and select “IMPORT”. A new section should appear showing the imported metadata. If you receive an error message that the record already exists, follow the instructions to edit the existing record instead of importing a new one.
Note
Enter just the DOI without the URL part (i.e., 10.1016/j.neubiorev.2025.106386 and not https://doi.org/10.1016/j.neubiorev.2025.106386)
Confirm, add, or edit the Title, Abstract, and Authors as necessary. For authors that are not automatically linked upon import to Person records in the pool, you can click and search directly in the “Linked Record” column to find a corresponding Person record in the pool; if no linked record is selected, a new Person record will be created for that author. Click “SAVE” when everything looks correct.
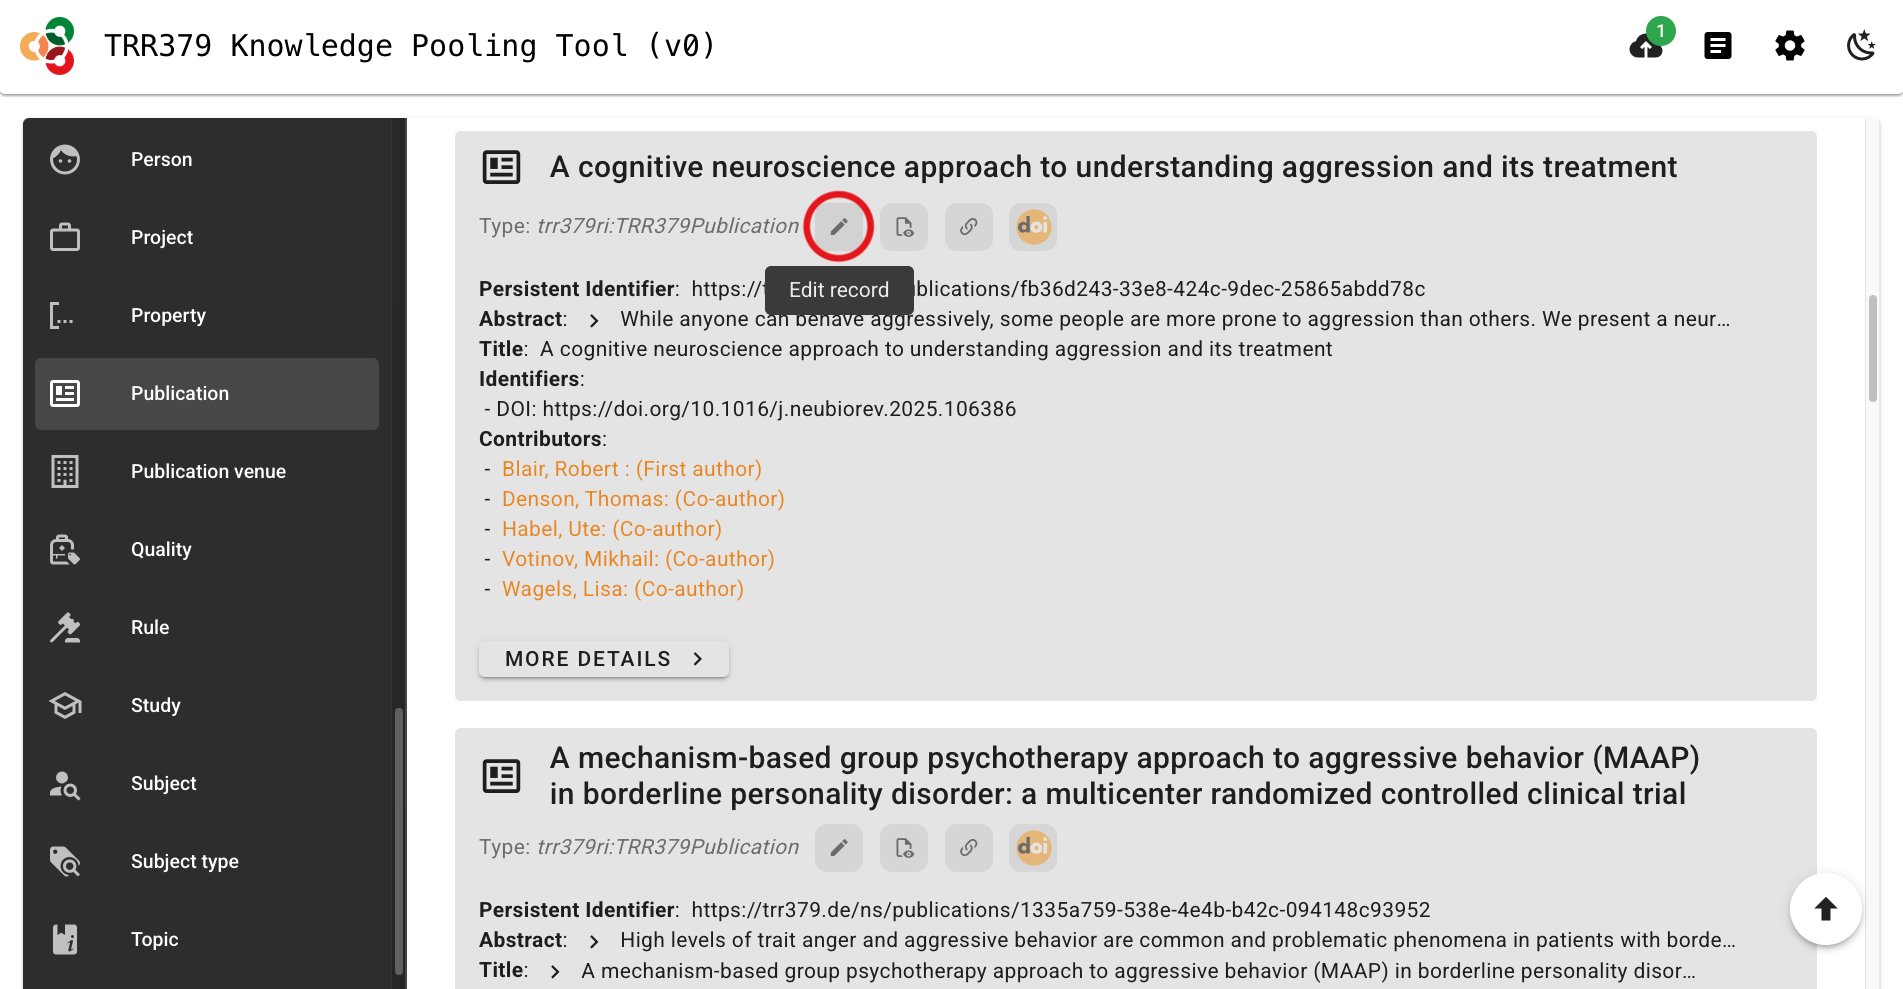
Navigate to your new Publication record in the pool’s Publication records list, and click the pencil icon to edit it.
For publications to make the best impressions and live up to their fullest metadata potential, proceed to add relevant information to complete the Publication record as follows:
Publication type
Within the “Publication type” box, select the appropriate type (e.g., “Academic article”) from the dropdown menu.
Topic(s)
Within the “Topic(s)” box, browse and select topics relevant to the publication from the dropdown menu.
To add additional topics, select the + (plus) button to the right of the “Topic(s)” box.
Publication journal and date
Within the “Generated by” box, select “Activity” from the dropdown menu.
A new box will appear just below “Activity”. Select “Publishing process” from the dropdown menu.
Click the pencil icon to add qualifying information (i.e., publication time and location).
Add the publication date to the “At time” box in the format, YYYY-MM-DD. Alternatively, you can click the calendar icon to select the date.
Add the publication venue/journal by searching its name within the “At location” box, and selecting the correct name when it appears in the dropdown menu. Alternatively, you can search the journal’s ISSN. Wait a few seconds for choices to populate before creating a new record; search results may take time to load.
Click “SAVE” in the top-right corner to save the publication journal and date information.
Associated project(s)
Within the “Generated by” box, select “Project” from the dropdown menu.
A new box will appear just below “Project”. Browse and select a TRR379 project associated with the publication from the dropdown menu.
To add additional projects, select the + (plus) button to the right of the “Generated by” box.
License
If the publication has a particular license (e.g., within the Creative Commons suite), select the appropriate license from the dropdown menu within the “Rules” box.
Funding acknowledgment
At the very bottom of your Publication record editing screen, toggle the “All fields” option to on (indicated in blue).
Within the “Annotations” box, search “TRR funding” and select whether TRR funding is or is NOT acknowledged in the publication.
Once all relevant information has been entered, click “SAVE” in the top-right corner to save the Publication record. After saving, a well-curated publication record links to its authors, topics, and projects.
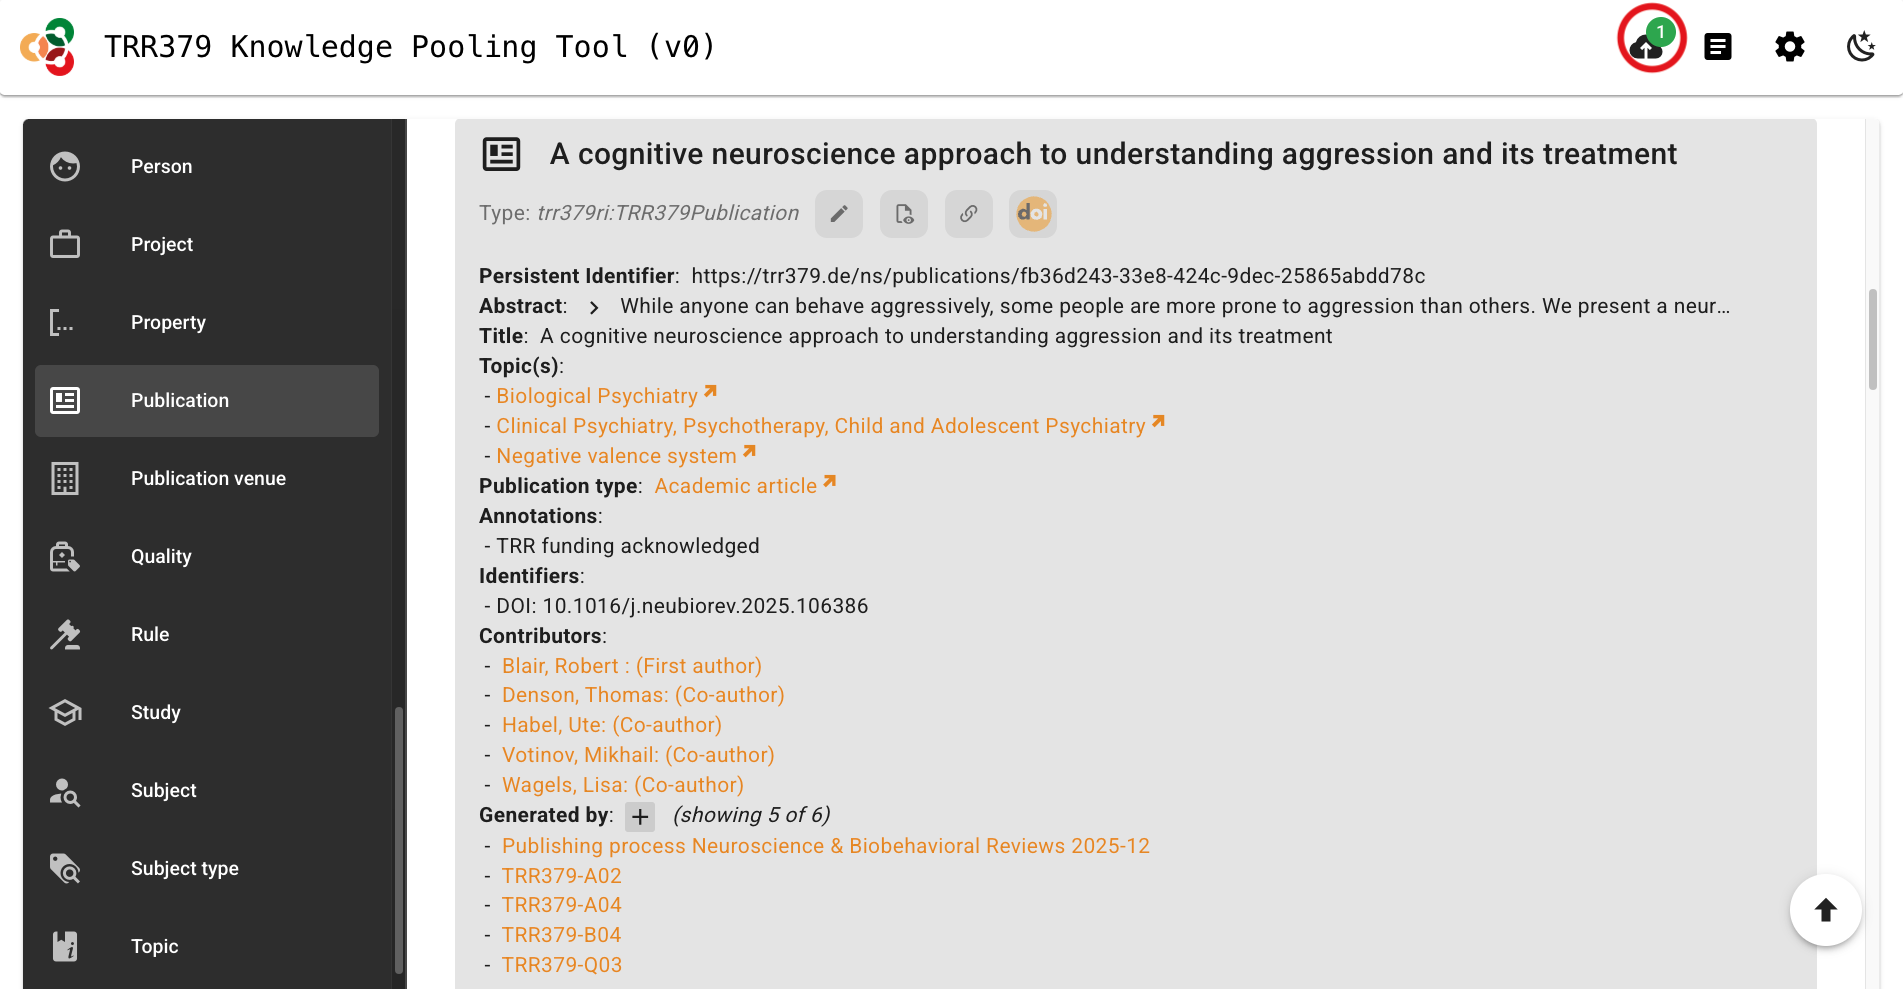
Click the “Submit” button (cloud icon, top-right), which should show a green notification dot to indicate changes are ready to be submitted.
Important note about saving versus submitting
The pool has two separate actions: saving and submitting.
Saving stores your work in the browser only!
It does notsubmit the record to the server for use by the consortium workflows.
To submit, click the Submit button (cloud icon, top-right corner) when there is a green notification dot indicating records are ready for submission.
Do not close your browser tab before submitting, or your data will be lost.
The interface will list all records you are about to submit. You should see your Publication record here.
Click “Submit”. A confirmation message will appear when submission is successful. If an error occurs, note the message and retry. If it persists, you may wish to review common error messages or reach out for help via the resources on the Support page.
Document instruments and questionnaires
TRR379 uses the knowledge pool to document research instruments and questionnaires, and to provide standardized identifiers that can be used when harmonizing data across sites.
You can document an instrument at different levels.
In particular, questionnaires can be documented as:
the original instrument or questionnaire,
a TRR379-specific version or variant,
individual questionnaire items, and
where useful, site-specific versions of an instrument or item.
These records can be linked to one another to expose the relationships between the original instrument, TRR379 versions, and individual questionnaire items.
You do not need to complete every level or every metadata field at once.
Instrument documentation is an iterative process.
A basic record with a clear identifier and name is already useful and can be expanded later.
Document an instrument
If you have an instrument that is used in TRR379, start by creating an Instrument record in the knowledge pool.
At a minimum, give the instrument a meaningful name and a persistent identifier.
If you know the description, instrument type, source publication, or relationships to other records, add those as well.
You can always add additional information later.
Read the disclaimer, and if you agree, select “Authorize Application”.
A checkmark will appear on to the “Login” (human silhouette) button if you were successfully logged in.
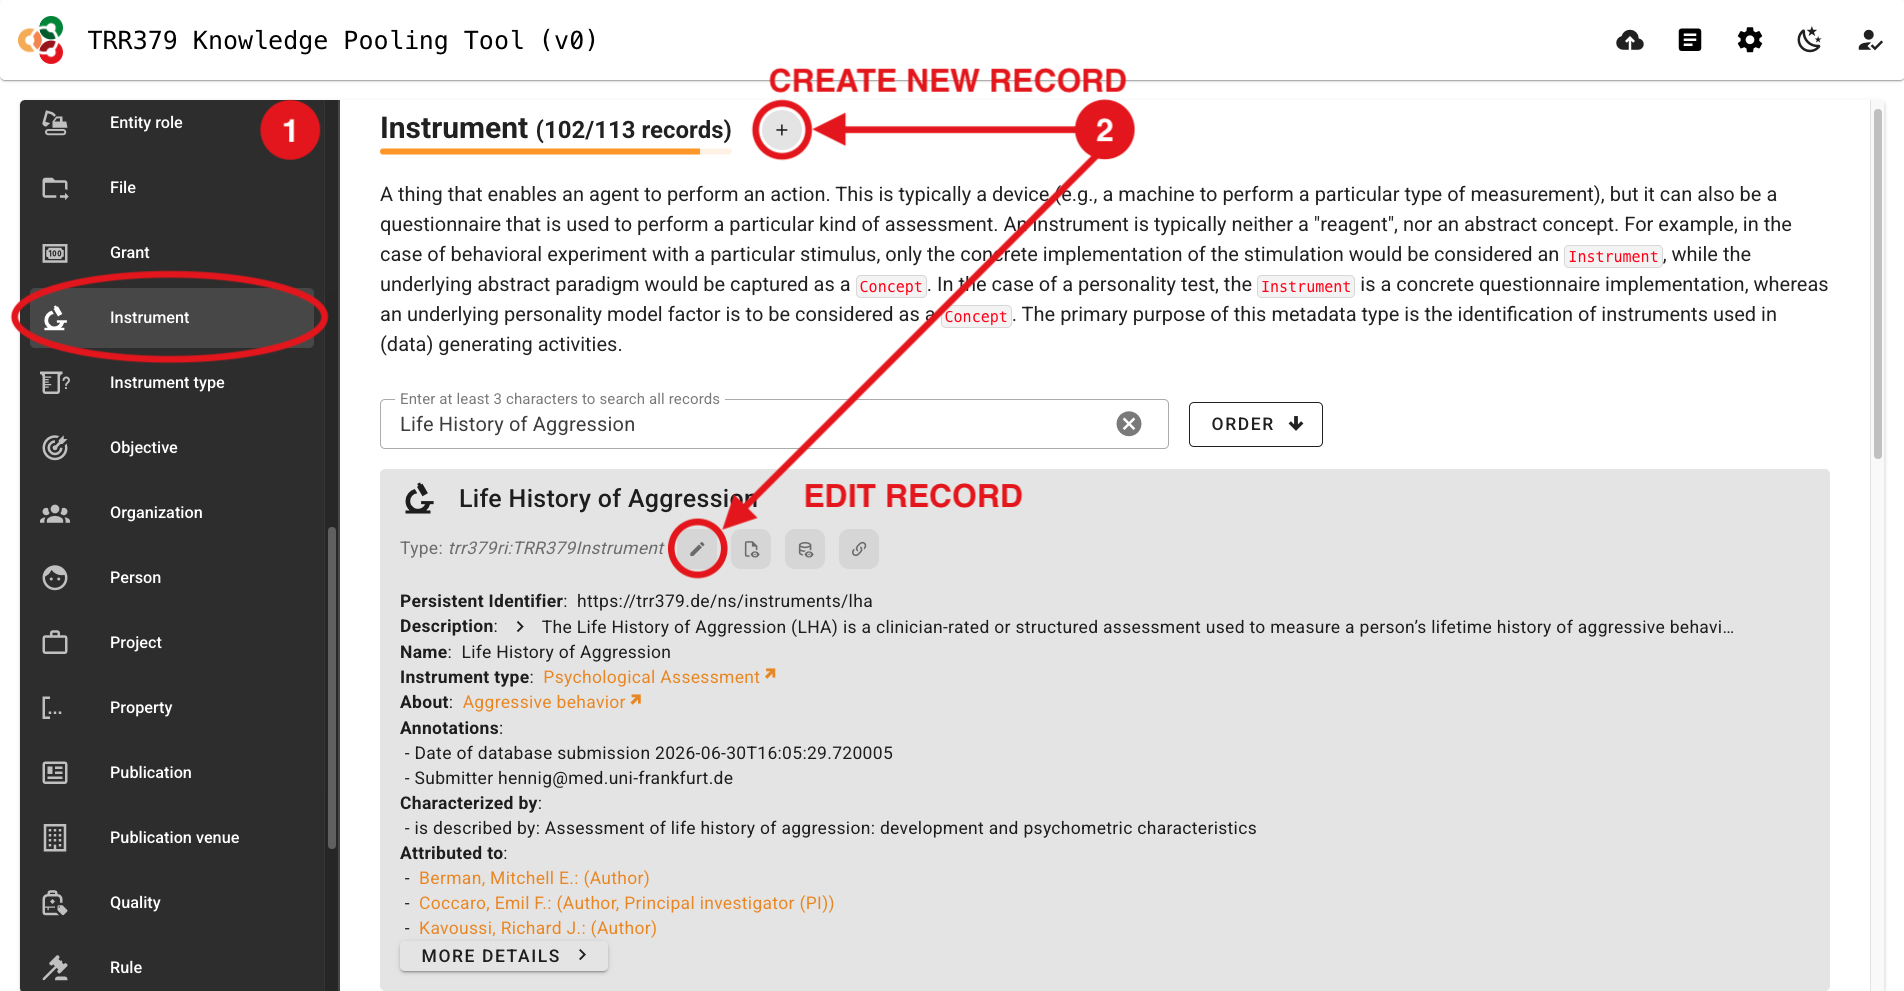
Select the “Instrument” Data Type on the left side of the page.
Create a new record by clicking the + (plus) button, or edit an existing record by clicking the pencil icon.
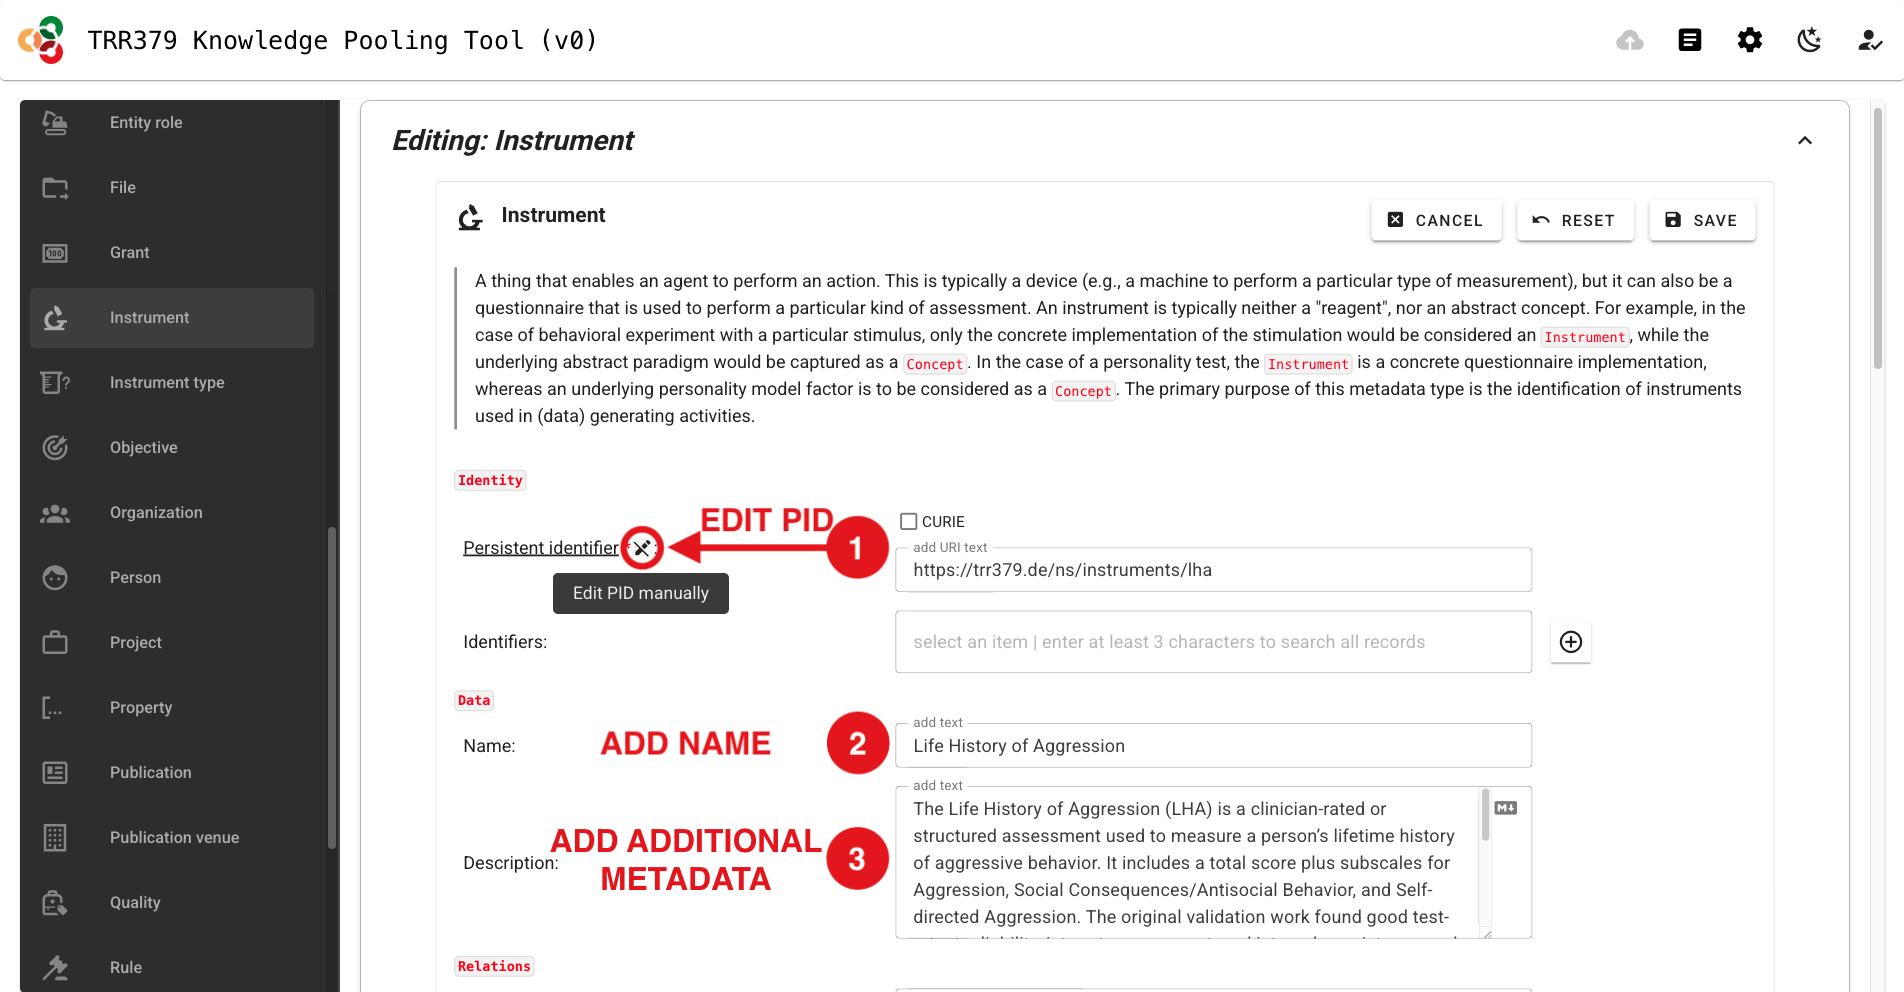
Click the “Edit PID manually” button (pencil icon to the right of “Persistent identifier”) and edit the random identifer according to the following naming convention:
Click the “Persistent identifer” pencil icon again to lock the PID editor.
Important information about PIDs
PIDs should be human-readable and should be sufficient for a knowledgeable human to understand what content is likely contained in that record.
These PIDs will end up as column header values in pertinent data tables.
The prefix, trr379: expands to https://trr379.de/ns/, and can be left out in any TRR379 internal usage.
Within the scope of a data table, the instrument identifier can be further shorted by stripping trr379:instruments/, leaving, for example, lha-trr379-q01-item1 as an item identifier (e.g., as a column header value).
Within the “Name” box, enter a human-readable name for the content in your Instrument record.
As is relevant, this might take the format: <original_instrument_name>, <subscale_name> (<trr379_variant>), or for a specific questionnaire item it would simply be the text for that question.
Once all relevant information has been entered, click “SAVE” in the top-right corner to save the Instrument record.
Click the “Submit” button (cloud icon, top-right), which should show a green notification dot to indicate changes are ready to be submitted.
Important note about saving versus submitting
The pool has two separate actions: saving and submitting.
Saving stores your work in the browser only!
It does notsubmit the record to the server for use by the consortium workflows.
To submit, click the Submit button (cloud icon, top-right corner) when there is a green notification dot indicating records are ready for submission.
Do not close your browser tab before submitting, or your data will be lost.
The interface will list all records you are about to submit. You should see your Instrument record here.
Click “Submit”. A confirmation message will appear when submission is successful. If an error occurs, note the message and retry. If it persists, you may wish to review common error messages or reach out for help via the resources in the Support page.
Tip
At a minimum:
Use a meaningful, human-readable PID.
Give the record a meaningful name.
Save and submit the record.
Everything after that is a (welcomed) bonus.
Document a questionnaire
Questionnaires can be represented at several levels.
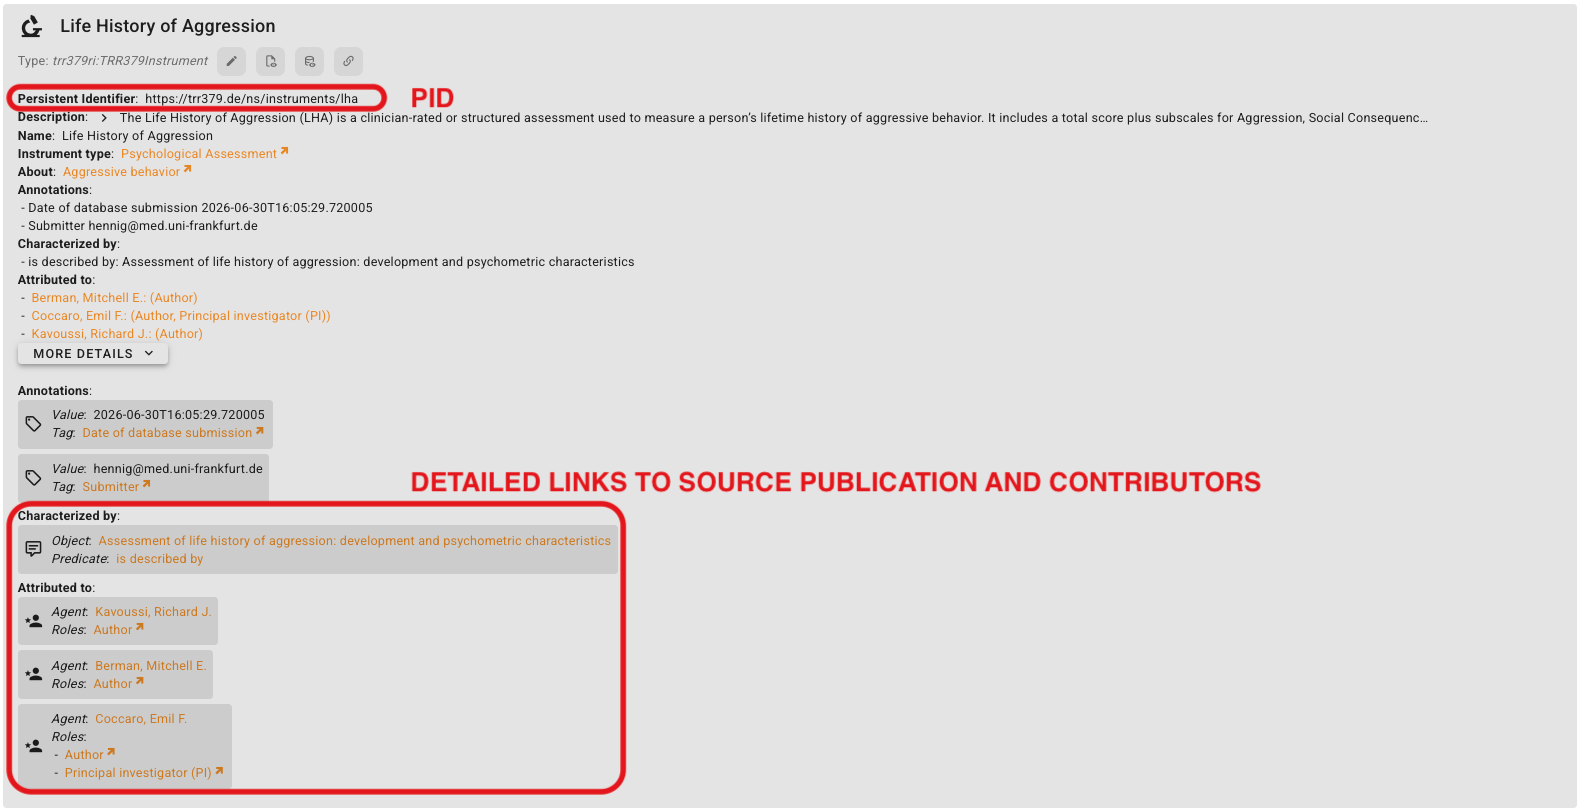
If the original instrument/questionnaire is known, create a record for it, give it a PID in the format, trr379:instruments/<original_instrument> (e.g., trr379:instruments/lha) and, where possible, link it to its source publication or other canonical documentation.
TRR379 questionnaire variant
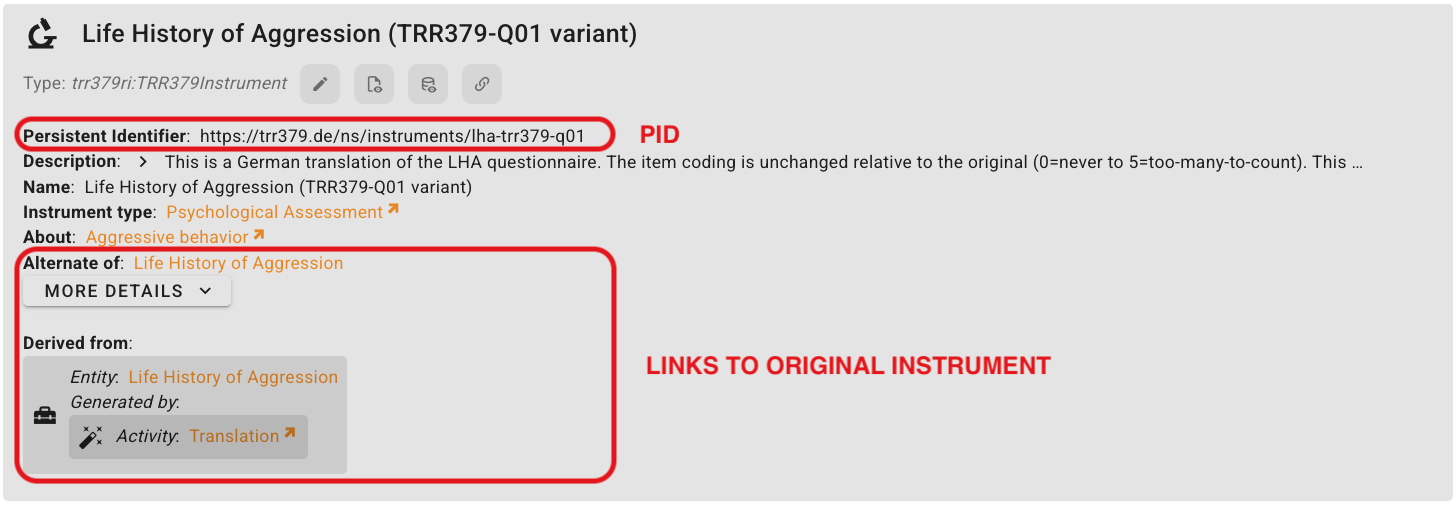
TRR379-specific versions take on the PID format, trr379:instruments/<original_instrument>-<trr379_variant_and_version> (e.g., trr379:instruments/lha-trr379-q01).
This is where you should document meaninful differences from the original questionnaire, including:
translation
modified wording
different item selection
coding differences
particular TRR379 projects using the variant
Questionnaire items
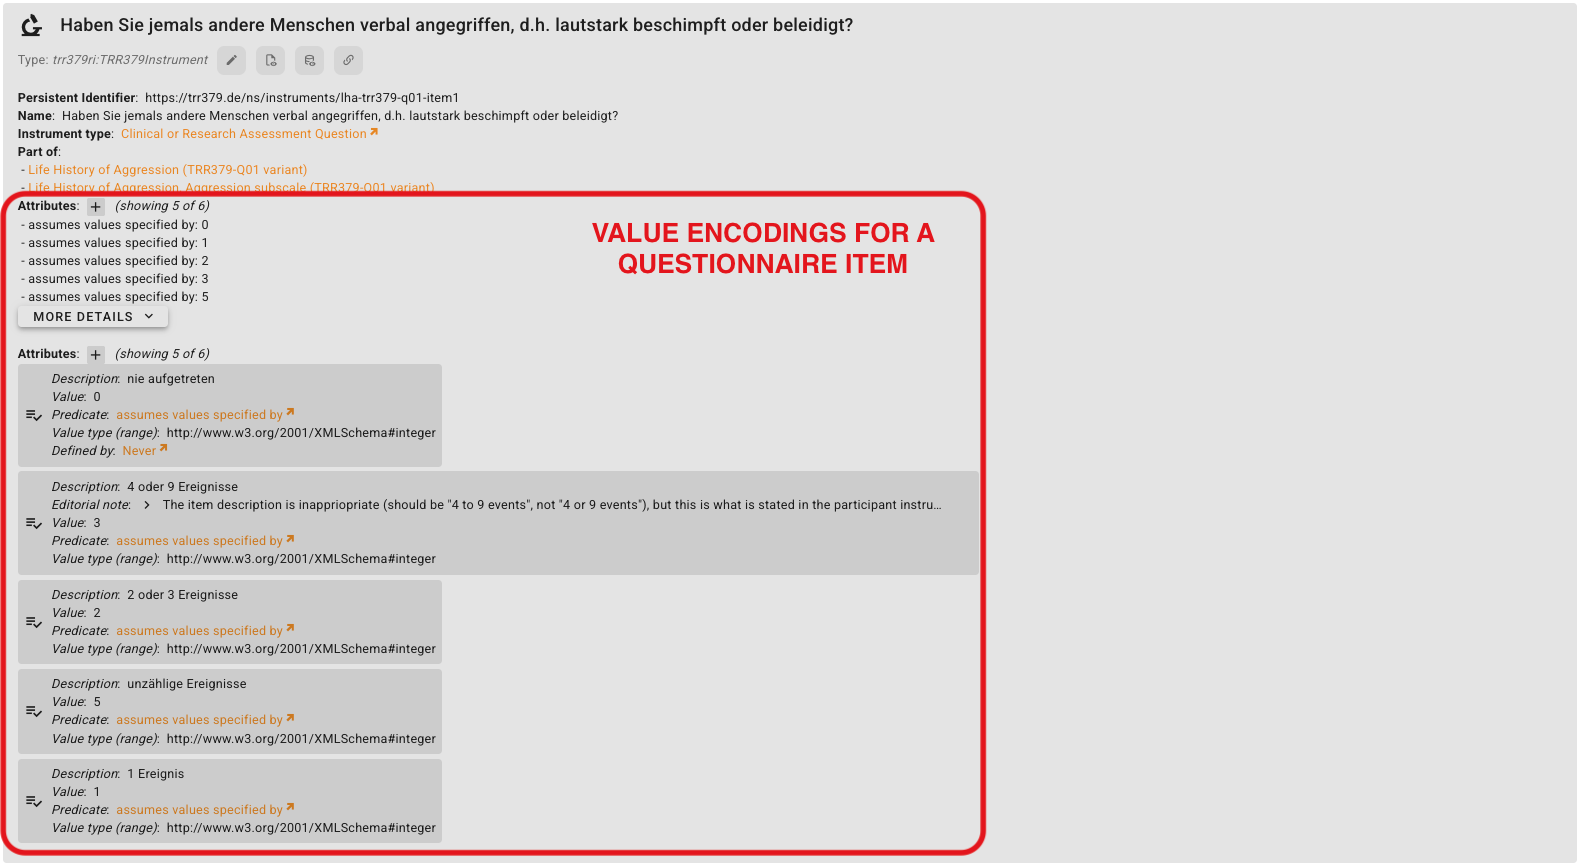
If the individual questionnaire subscales and/or items (i.e., questions) are known, create a separate Instrument record for each item.
For LHA, for example:
Item-level identifiers allow sites to refer to the same questionnaire items consistently when preparing standardized datasets.
For each item, be sure to include:
Name: the actual question/item text
part of: the questionnaire/variant it belongs to
When available, this also where value encodings for answer options may be recorded.
Relationships
Relationships are useful when you know how the record relates to another instrument or questionnaire.
Relationship
Use when…
Example
part of
An item/subscale belongs to a questionnaire
There are 11 individual items that are part of the LHA
alternate of
Two records represent alternative versions of the same instrument
A TRR379 variant may be an alternate of the original instrument
derived from
A version was created from an earlier/original instrument
A TRR379 questionanire might be derived from the original instrument through the “Activity”, “Translation”
revision of
A new version revises an earlier version
A second version of a TRR379 questionnaire is a revision of the first version of that TRR379 questionnaire
Additional metadata
For instruments to live up to their fullest metadata potential, proceed to add relevant information as you are able.
For example:
Description
Within the “Description” box, enter any information that is pertinant to understand what content is contained in your Instrument record.
For example, this may be a description/abstract taken directly from an original instrument’s documentation or related publication, or this could include details on how a TRR379 variant was changed (or not) from the original form (e.g., translations, item coding, which TRR379 projects use the variant, etc.)
Instrument type
Within the “Instrument type” box, select the appropriate type from the dropdown menu.
For questionnaires and their items, relevant types might include (but are not limited to): Psychological Assessment, Clinical or Research Assessment Subscale, Clinical or Research Assessment Question
Topic(s)
Within the “About” box, select the “FILTER DATA” button and make sure only “Topic” is checked to browse and select from the dropdown menu topics relevant to your Instrument record.
To add additional topics, select the + (plus) button to the right of the “About” box.
Relationship(s)
Within the relevant “Part of”, “Alternate of”, and/or “Specialization of” boxes, select the linked Instrument record from the dropdown menu. For example, a TRR379 questionnaire variant may be an alternate of the original instrument, a subscale may be part of a TRR379 variant, and a questionnaire item may be part of a TRR379 variant, as well as a subscale.
To add additional links, select the + (plus) button to the right of the “Part of”, “Alternate of”, and/or “Specialization of” boxes.
Provenance
Where known, record where an instrument or questionnaire variant came from, and how it relates to previous versions.
Add source documentation and contributors: Within the “Attributed to” box, select “Person” from the dropdown menu. Search for or add the author that contributed to the Instrument you are documenting. You can additiomal link the source documentation by adding to the “Characterized box” a new item with the Predicate, “is described by”, and the Object linking to the relevant Publication.
Add derivations for variants: Within the “Derived from” box, select the linked Instrument record from the drop down menu. Click the pencil icon to the right of the box to add the “Generated by” relationship. For example, a TRR379 questionnaire might be derived from the original instrument through the “Activity”, “Translation”. Click “SAVE” in the top-right corner to save the derivation information.
Add revisions for different versions: Within the “Revision of” box, select “ADD NEW ITEM”. Within the “Entity” box, select the instrument your record is a revision of. For example, a second version of a TRR379 questionnaire is a revision of the first version of that TRR379 questionnaire. Click “SAVE” in the top-right corner to save the revision information.
Value encodings
For counts, select the “Count” Concept within the “About” box’s dropdown menu and “range (value type): nonNegativeInteger” from the “Characterized by” box’s dropdown menu.
For categorical values, select “ADD NEW ITEM” within the “Attributes” box. At a minimum enter the “Value” and its “Description”. Select “assumes values specified by” within the “Predicate” box. Optionally, you can add semantics for “Defined by” and “Value type (range)” when appropriate.