Subsections of How to ...
Fulfill RTG requirements
All PhD students funded by the TRR379 participate in its Research Training Group.
This involves certain obligations, of which you can find an overview below:
Participation
- internal meetings
- attendance via Zoom (in library | Aachen only)
- present own work twice (once | medical students only)
- lecture series
- attendance via Zoom (on-site option for lecture location)
- chair one session (optional | medical students only)
- workshops
- attend obligatory + 3 (1 | medical students only) voluntary
Note of absence requirement
Send a note of absence (via email) in case of illness | traveling for work | holidays | non-self-arranged meetings*
Documentation via Gitlab
- upload CV (+ motivation letter | medical students only)
- submit thesis proposal (use template)
- sign supervision agreement
- register as member
- insert link to shared logbook (use template)
- plan + log event participation
- list thesis advisory committee meetings
- plan lab visits
- register for the annual RTG retreat
- list attended conferences
Get a Hub account and log in
For working with the TRR379 collaboration platform an account is required. You can either request an account manually, or sign in using “GitLab Aachen” single Sign-On (SSO).
Single Sign-On using GitLab Aachen
In order to sign in with Gitlab-Aachen, visit the TRR379 collaboration platform and click Sign in with Gitlab-Aachen on the login page. Login using your preferred identity provider (i.e., GitHub or your affiliated organization via DFN-AAI SSO). Follow the on-screen instructions to activate your account.
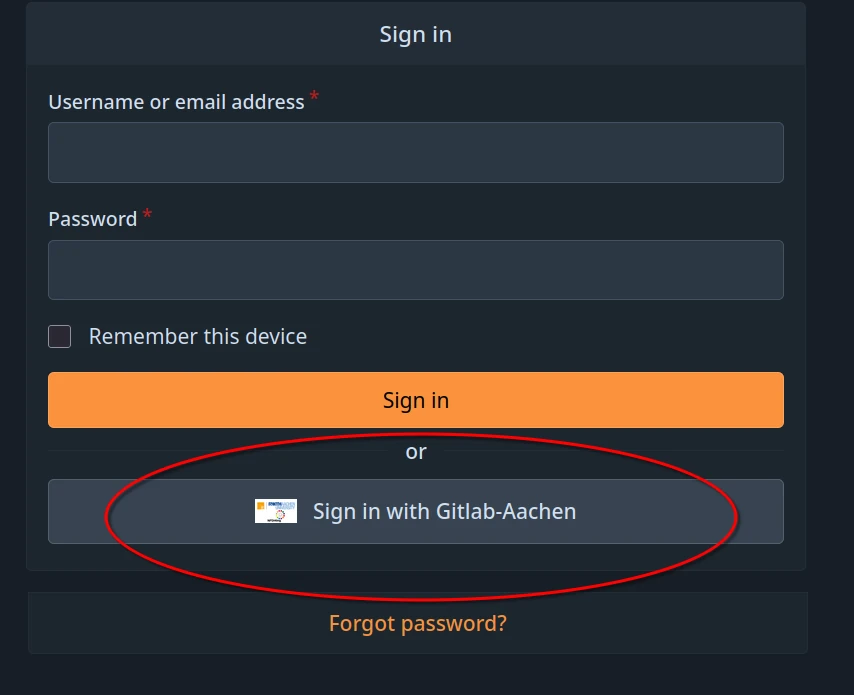
Make sure to visit the confirmation link that will be sent to the email address associated with the account.
Upon confirmation the account will be in a restricted state for security reasons. It will allow for login, but will not give read or write access to any resources. New accounts will then be assigned to the respective projects. To expedite the process, please email trr379@lists.fz-juelich.de with a list of resources you need read and/or write access too (i.e., the knowledge pool, the main website, data hosting).
Manual request
In order to obtain an account manually, please email trr379@lists.fz-juelich.de. Please email from an institutional email, and CC the respective TRR379 project lead. In the email, please mention any projects and/or organizations you require read or write access to.
Please note that a manual request will not allow for using your institutional single-sign-on (SSO).
Edit the website
The main TRR379 website is automatically rendered with Hugo. The website sources are hosted on the TRR379 collaboration hub in a repository under the Q04 project organization.
This repository is a DataLad dataset, the same technology that is used for research data management in the TRR379.
The repository README contains instruction on how to obtain a clone of the website for working on it, and testing it locally.
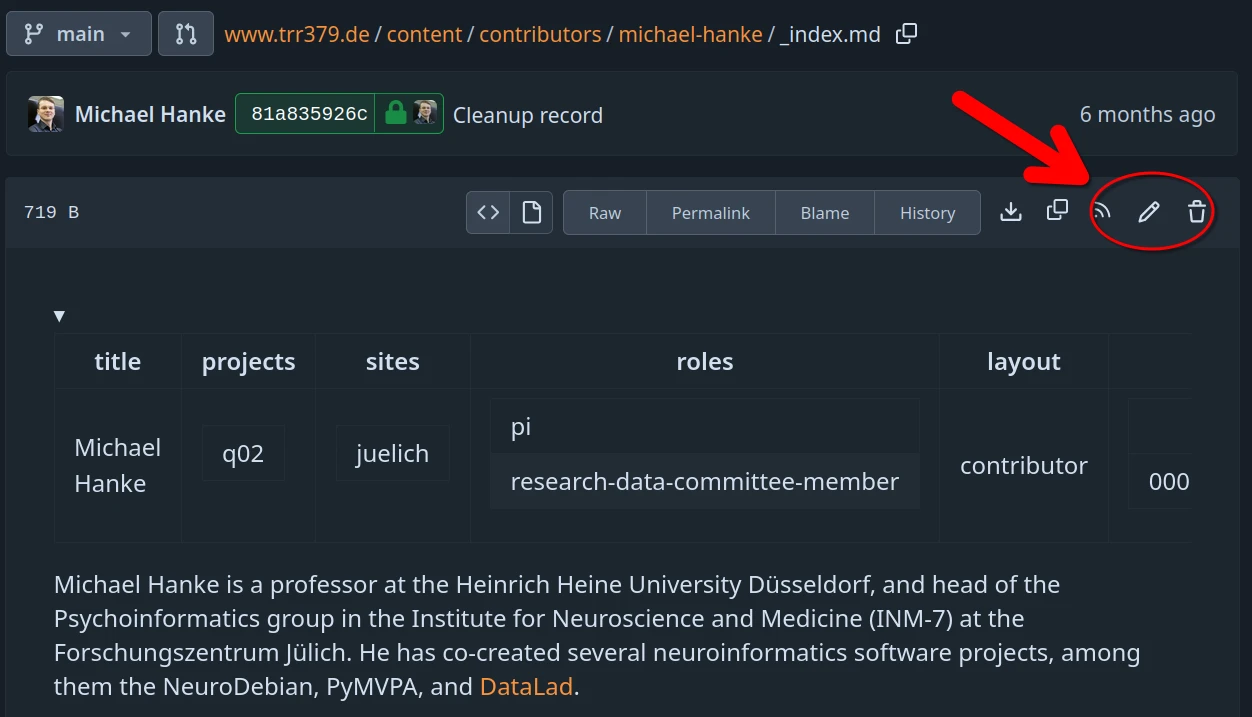
Alternatively, small edits can be done on the collaboration hub directly. The content of all pages can be browsed at https://hub.trr379.de/q04/www.trr379.de/src/branch/main/content.
Each page provides an “edit button” that enables editing content directly in the browser. The following screenshot show this button for the source file of the personal profile of Michael Hanke.
Once a change has been submitted, it is not reflected on the website immediately. All changes are reviewed and possibly adjusted by the website editor team of the Q04 project.
Use the knowledge pooling tool
The knowledge pooling tool is a platform for collecting, curating, and sharing structured information about research activities, outputs, and contributors across TRR379 projects and institutions. It includes:
- A web UI for submitting, editing, and browsing records such as people, projects, and publications
- A backend API allowing scripts and applications to contribute or retrieve metadata
- Token-based authentication that integrates with Forgejo teams on the collaboration platform to manage read and write permissions
The following workflows provide step-by-step guidance for working with the knowledge pooling tool:
Subsections of Use the knowledge pooling tool
Setup
This guide explains how to get started with the knowledge pooling tool, including how to access the system, authenticate as a contributor, and prepare for submitting or curating records. The focus of these steps differ depending on your role:
- Contributors/Submitters: Setup access to submit and view records
- Managers/Administrators: Configure authentication and permissions
Overview of access and authentication
Access to the knowledge pooling tool is managed using tokens and Forgejo teams. Forgejo-based authentication ensures that permissions are linked to existing institutional or project accounts. Tokens are used to identify users with interacting with the API or web UI.
Each user can hold different roles, such as:
- Submitter: Can create and modify records in their personal “inbox”.
- Curator: Can view, edit, and approve submitted records.
- Manager: Can configure access settings and team memberships.
Setup for general contributors and submitters
Collaboration hub access and permissions
To report and access records using the knowledge pooling tool, you must have read and write access to the protected collection of the pooling tool on the TRR379 collaboration platform.
You must be a member of both:
To confirm your team memberships, first sign into the TRR379 collaboration platform (see also How to get a Hub account and log in), then click the links above to see the team members. If you are unable to see the repository, team member list, or if your username is not listed, see below how to request access. Otherwise, proceed to generate a personal access token.
Request access to protected team(s)
If you are not yet a member of the metadata-pool-read-protected and/or metadata-pool-write-protected team(s), please email trr379@lists.fz-juelich.de with a request to be added. Please send the email from an institutional email with the respective TRR379 project lead in CC.
Generate a personal access token
Reading and writing records into the knowledge pooling tool requires a token linked to your Forgejo account.
Create a new token
From your collaboration platform account, navigate to Profile and settings > Settings > Applications > Generate new token.
Name the token, choose All for the repository and organization access, and click Select permissions to list further permissions; the token needs to have user:Read and organization:Read permissions. Click Generate token once all permissions are set.
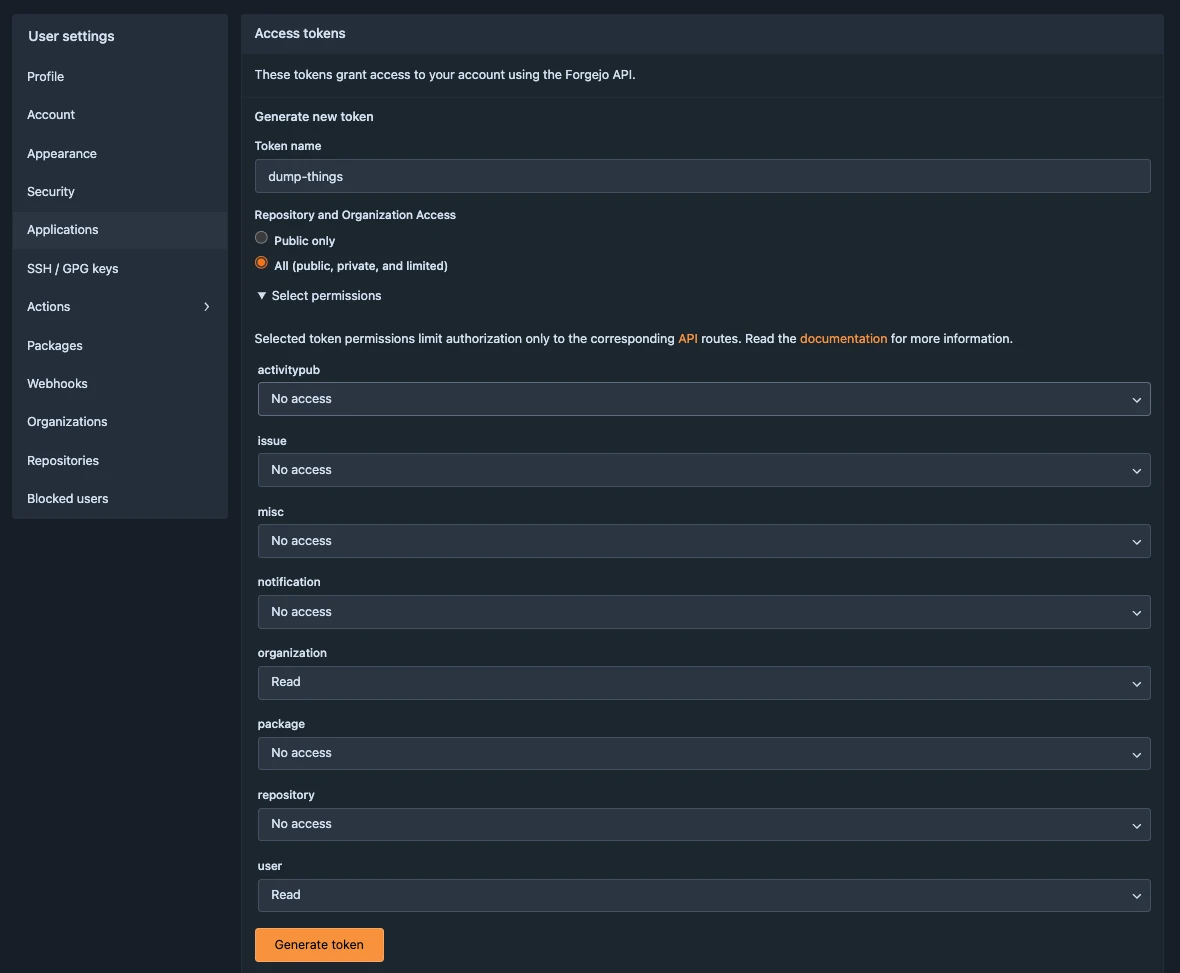
Copy the generated value and store your token securely; it will be used to authenticate your submission through the web UI and in API calls.
Important
Treat your token like a password. Do not share it publicly.
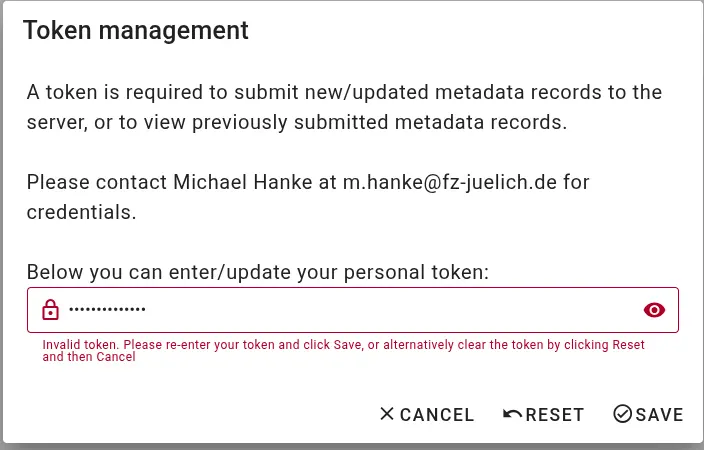
Test your token
You can verify that your token works using a simple API request:
If the token is valid, this command will return a (potentially empty) list of entries.
If the token is invalid, it will return an invalid token error, together with helpful information what may be wrong (e.g., wrong scopes).
Once your token is working and you have confirmed your access, you can proceed to the general usage guide and relevant workflows for instructions on how to enter or retrieve research metadata and outputs through the knowledge pooling tool.
Setup for managers and administrators
This section will describe how to configure the knowledge pooling tool from a management perspective, including:
- Defining collections (e.g.,
protected) and configuring the backend API (see also the Dump Things Service documentation) - Setting up and linking Forgejo teams for read and write access
General usage guide
This guide explains how to use the knowledge pooling tool’s shacl-vue web UI and dump-things API service to submit, edit, and review metadata records.
It applies to all record types, such as publications, personnel, projects, and topics.
For workflow-specific instructions (e.g., publication reporting), see the Workflows section.
Submit or edit a publication record using the web UI
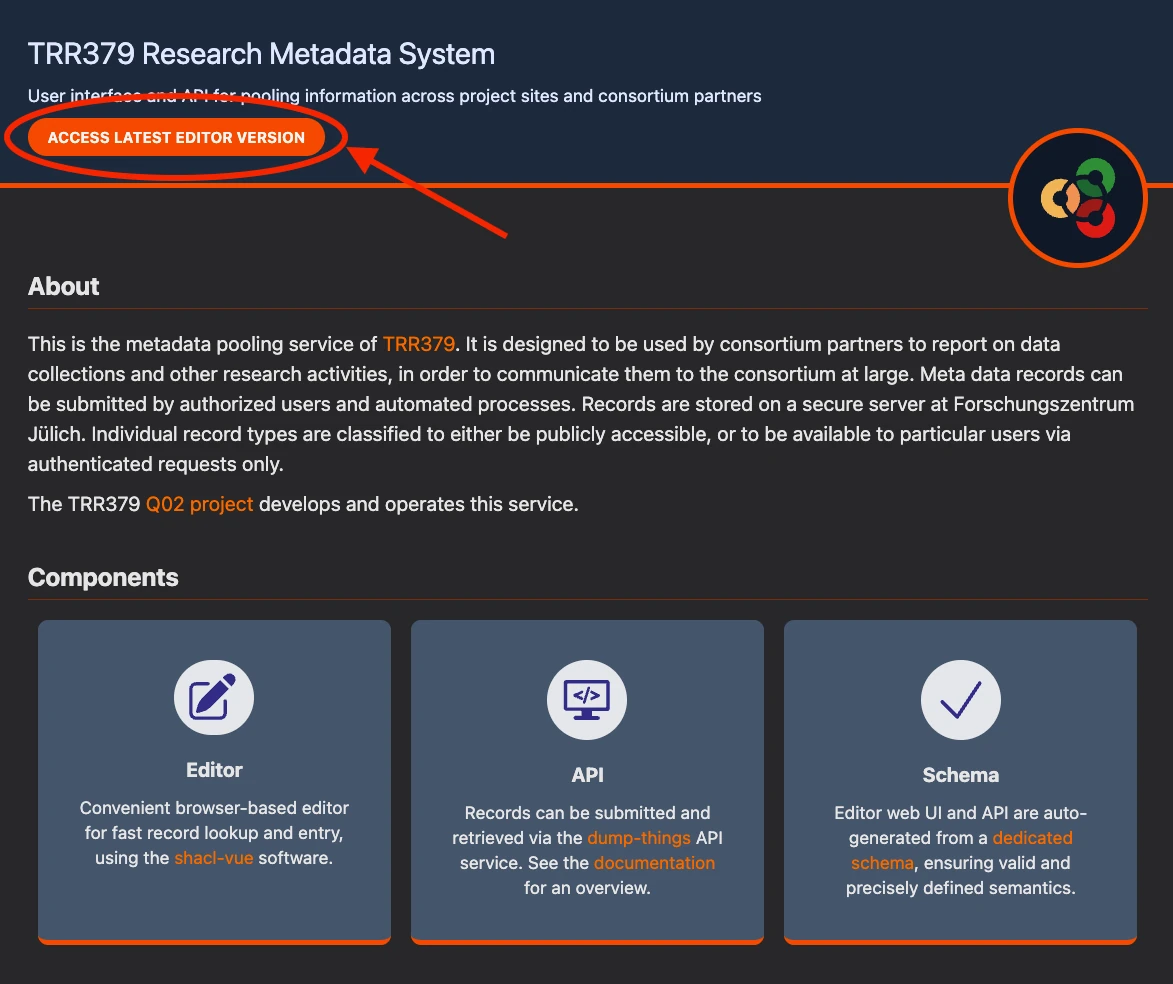
The web UI for submitting, editing, and browsing records is provided at https://pool.v0.trr379.de/.
Tip
It is highly recommended to use this web UI with a desktop browser; the form offers rich contextual information that is hard to access on mobile devices.
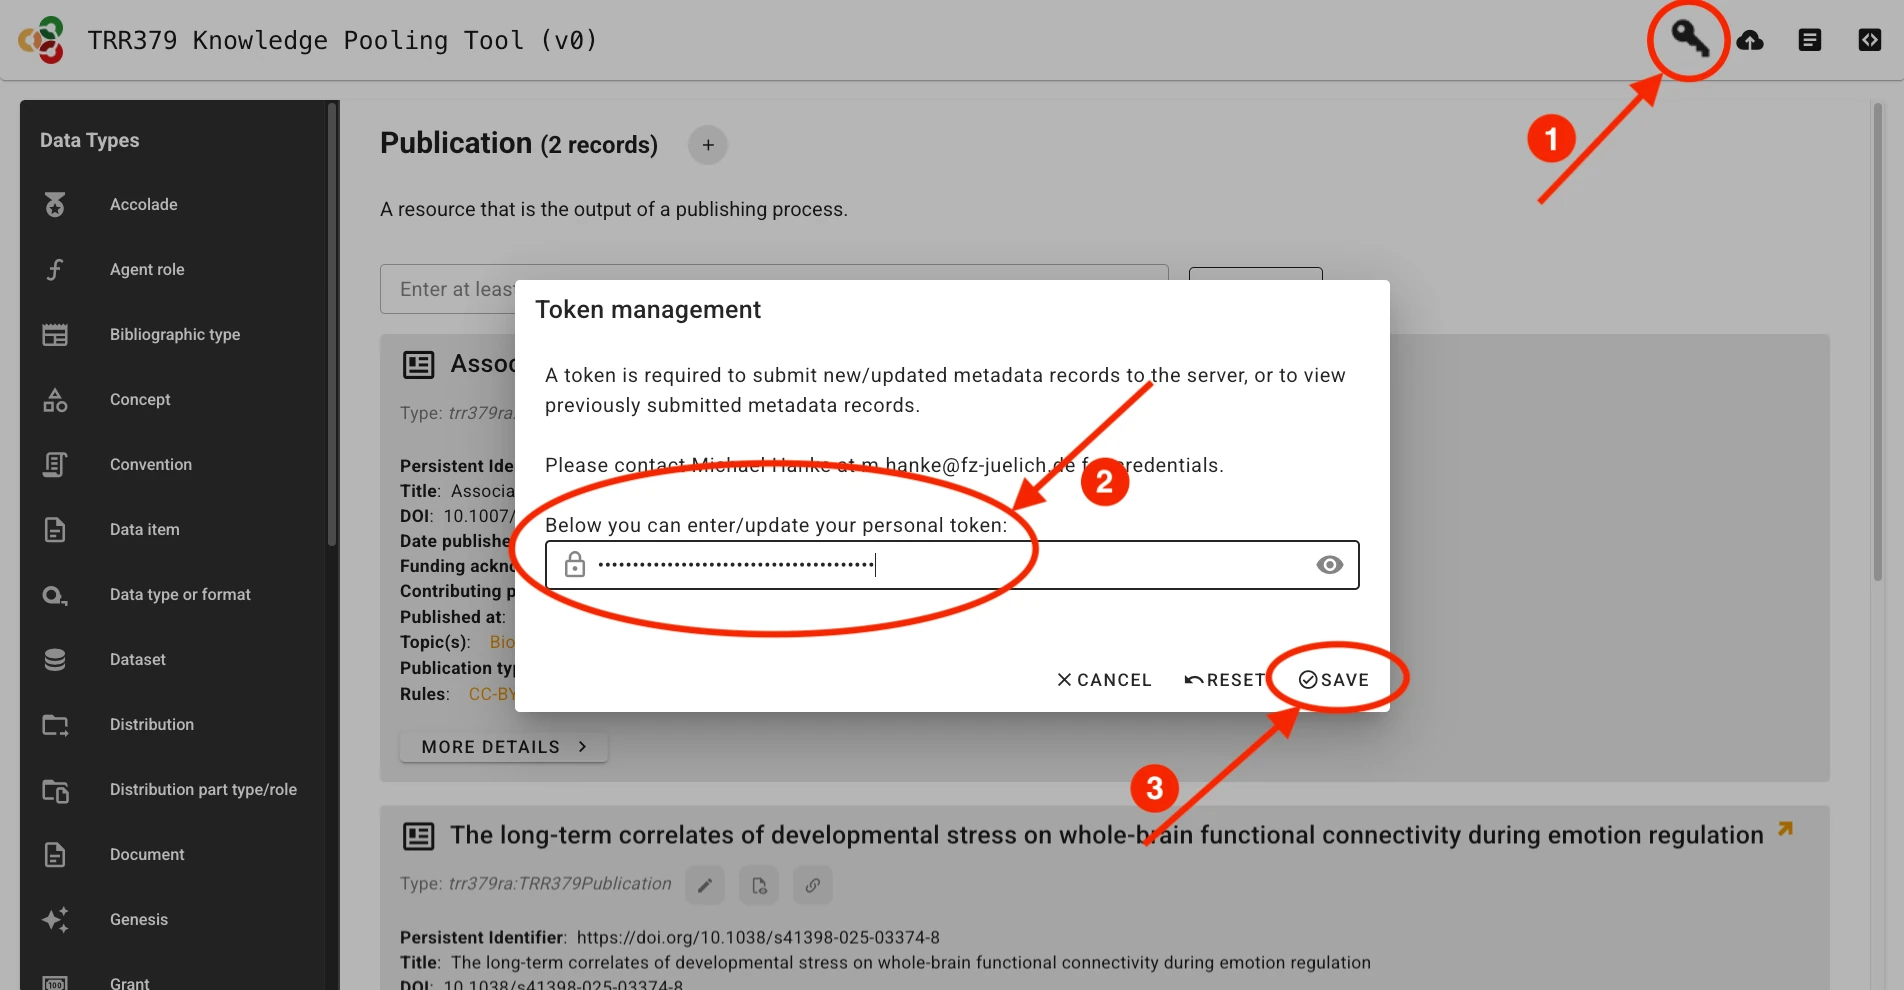
Authenticate with your access token
Submitting publication records will only be possible using a valid access token The token can be entered via the Key button in the web UI.
Create or edit a record
Records correspond to structured metadata entities (e.g., Person, Topic, Publication). Each record is created and managed through a form defined by the metadata schema.
If no record on a given entity already exists, a new record must be created.
Click the + (plus) button next to the desired record type (e.g., Publication or Person).
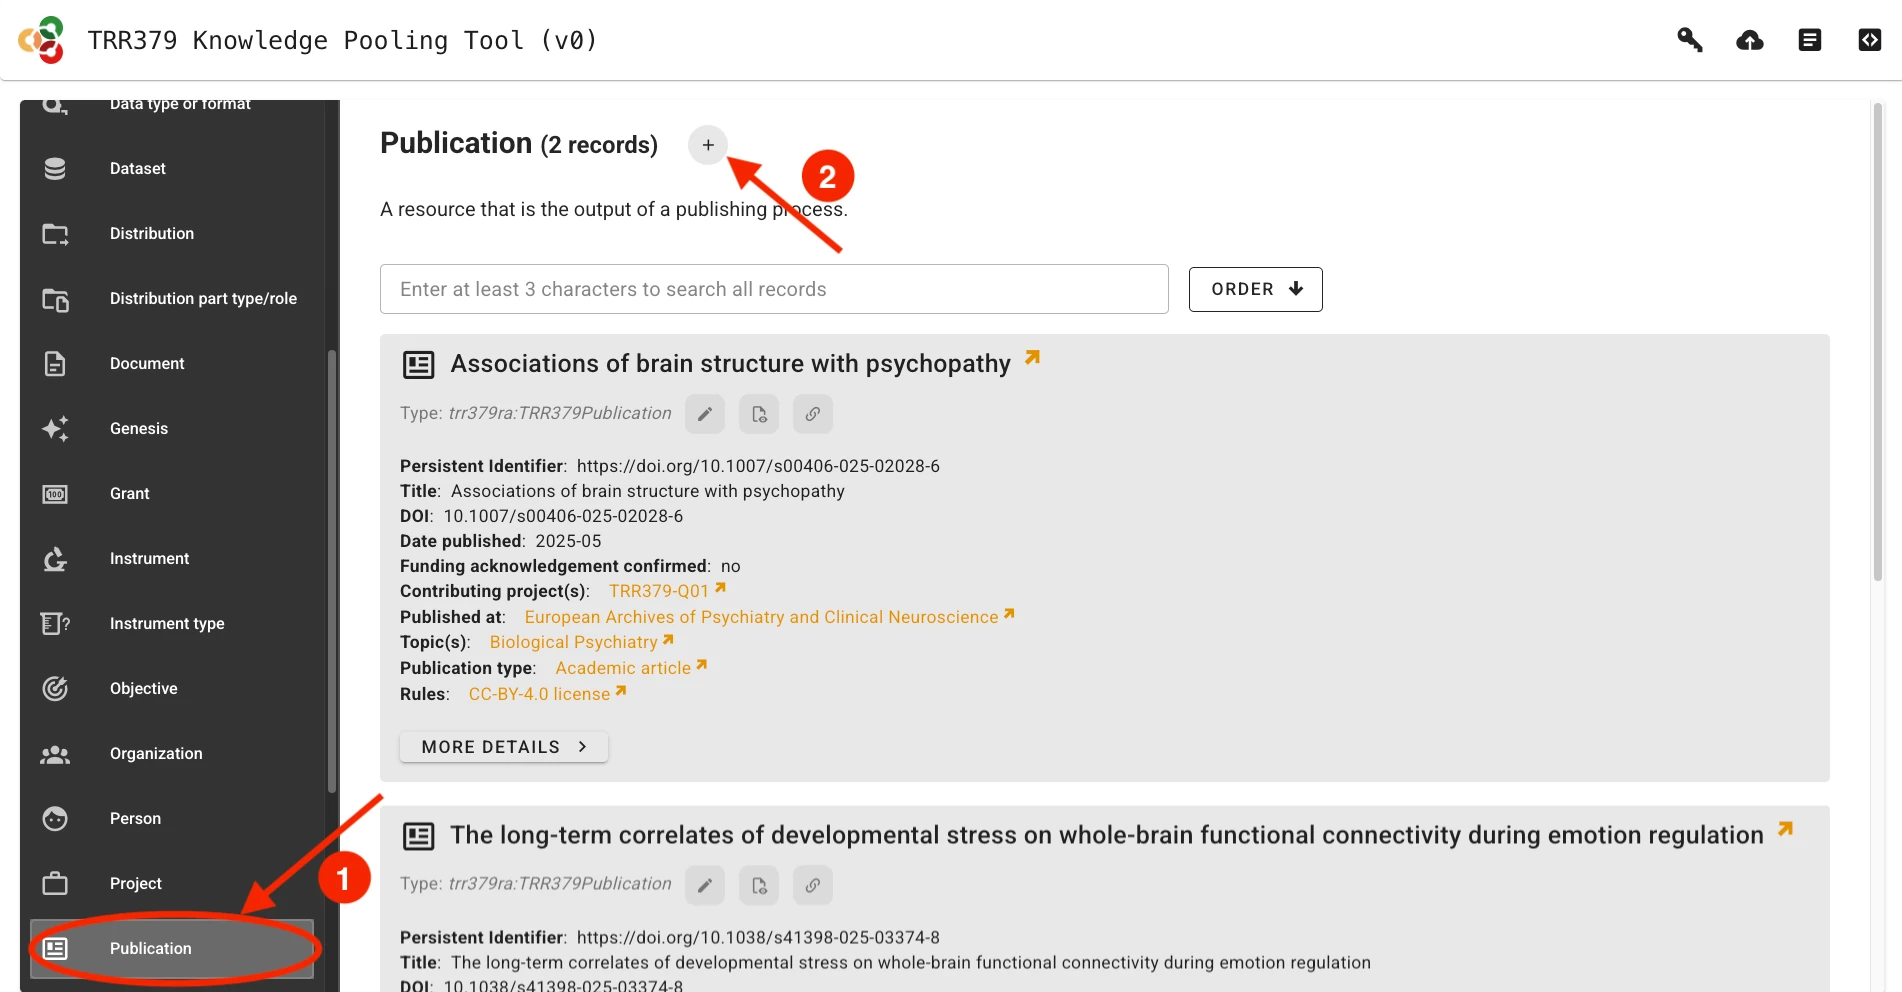
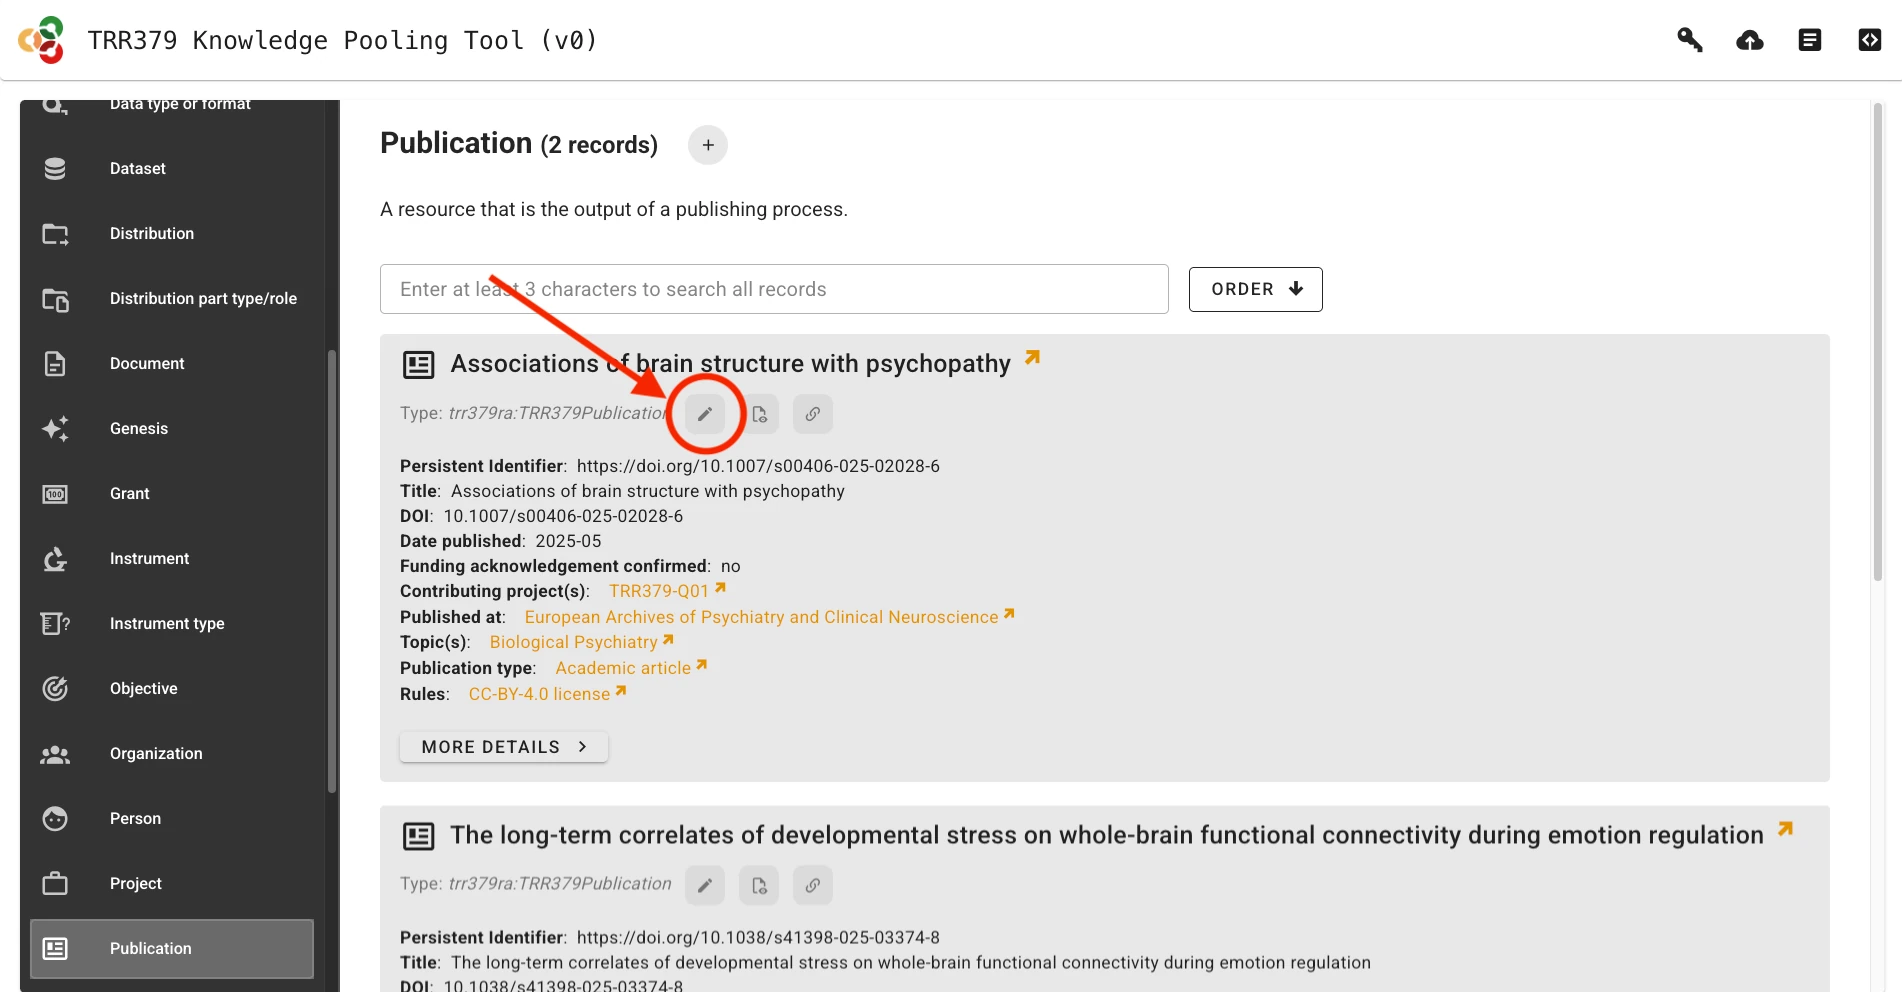
Alternatively, if a previous record already exists, it can be loaded by clicking on the Edit button (pencil icon). You can search for records by title/name, identifier, or other metadata attributes.
Fill out record fields
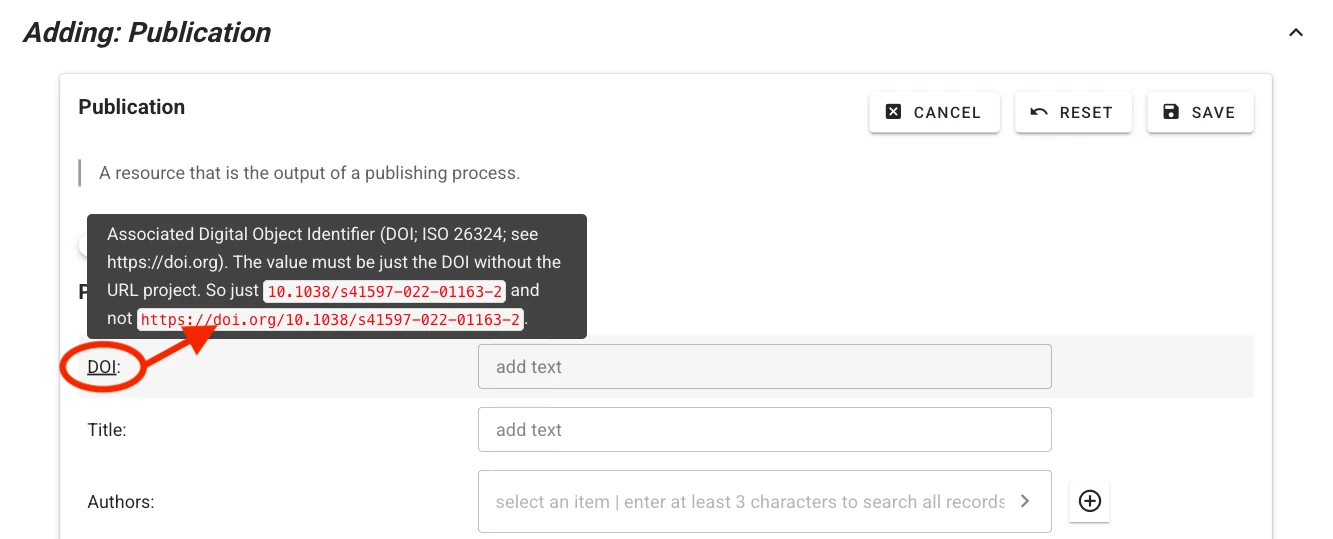
Context help describing expected values and controlled vocabularies is provided for each field. Hover your mouse pointer over the field label to display help text.
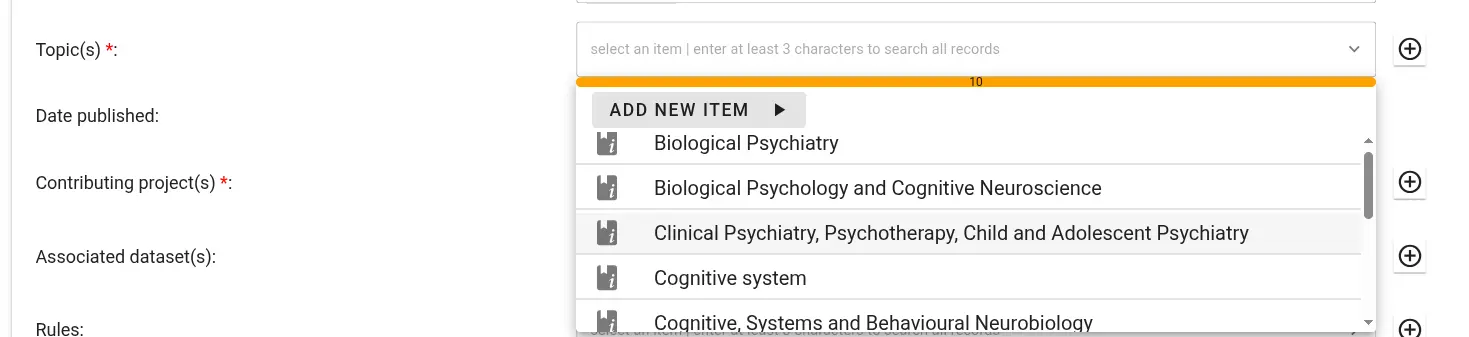
For some fields (e.g., authors or publication venue when filling out a publication record), one or more choices have to be selected. The selector offers type-ahead search of choices. The selection is contrained to choices matching the entered text in their label. Select the appropriate value from the dropdown list.
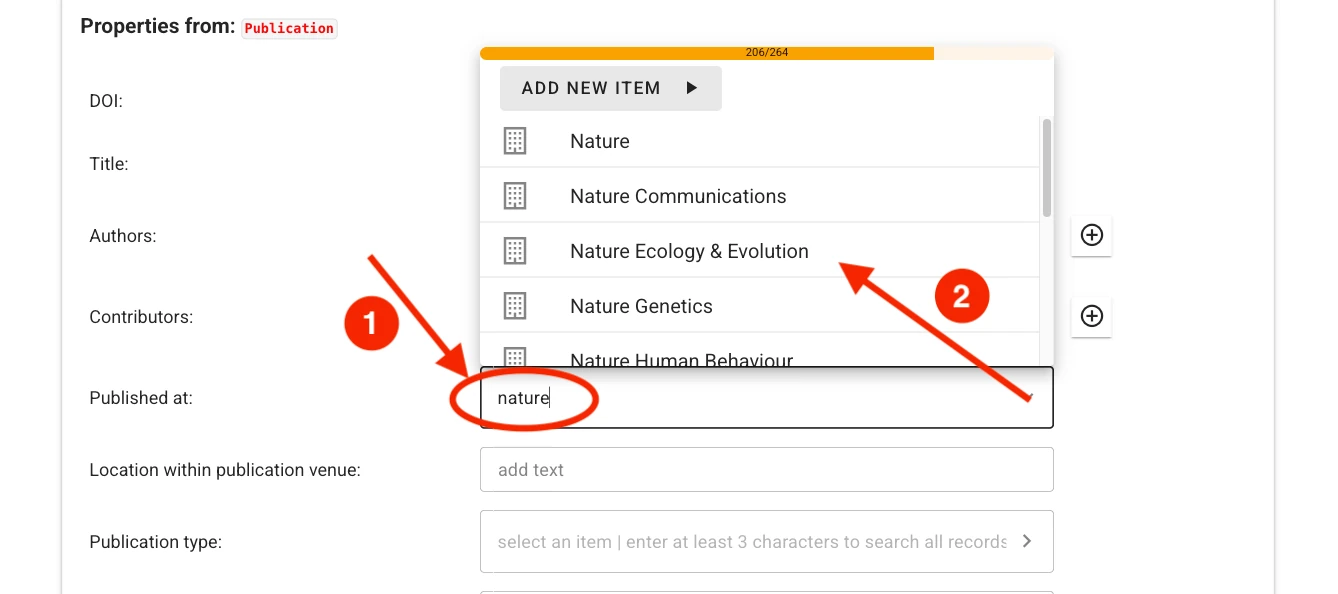
If no adequate choice exists, click Add New Item to create one.
Tips for Searching
- Try entering full names instead of abbreviations
- If an item is not found in one language, try searching its English version
- Wait a few seconds for choices to populate before creating a new record; search results may take time to load.
Save and submit records
Submitting metadata involves two different save actions: local saves and submitting to the server.
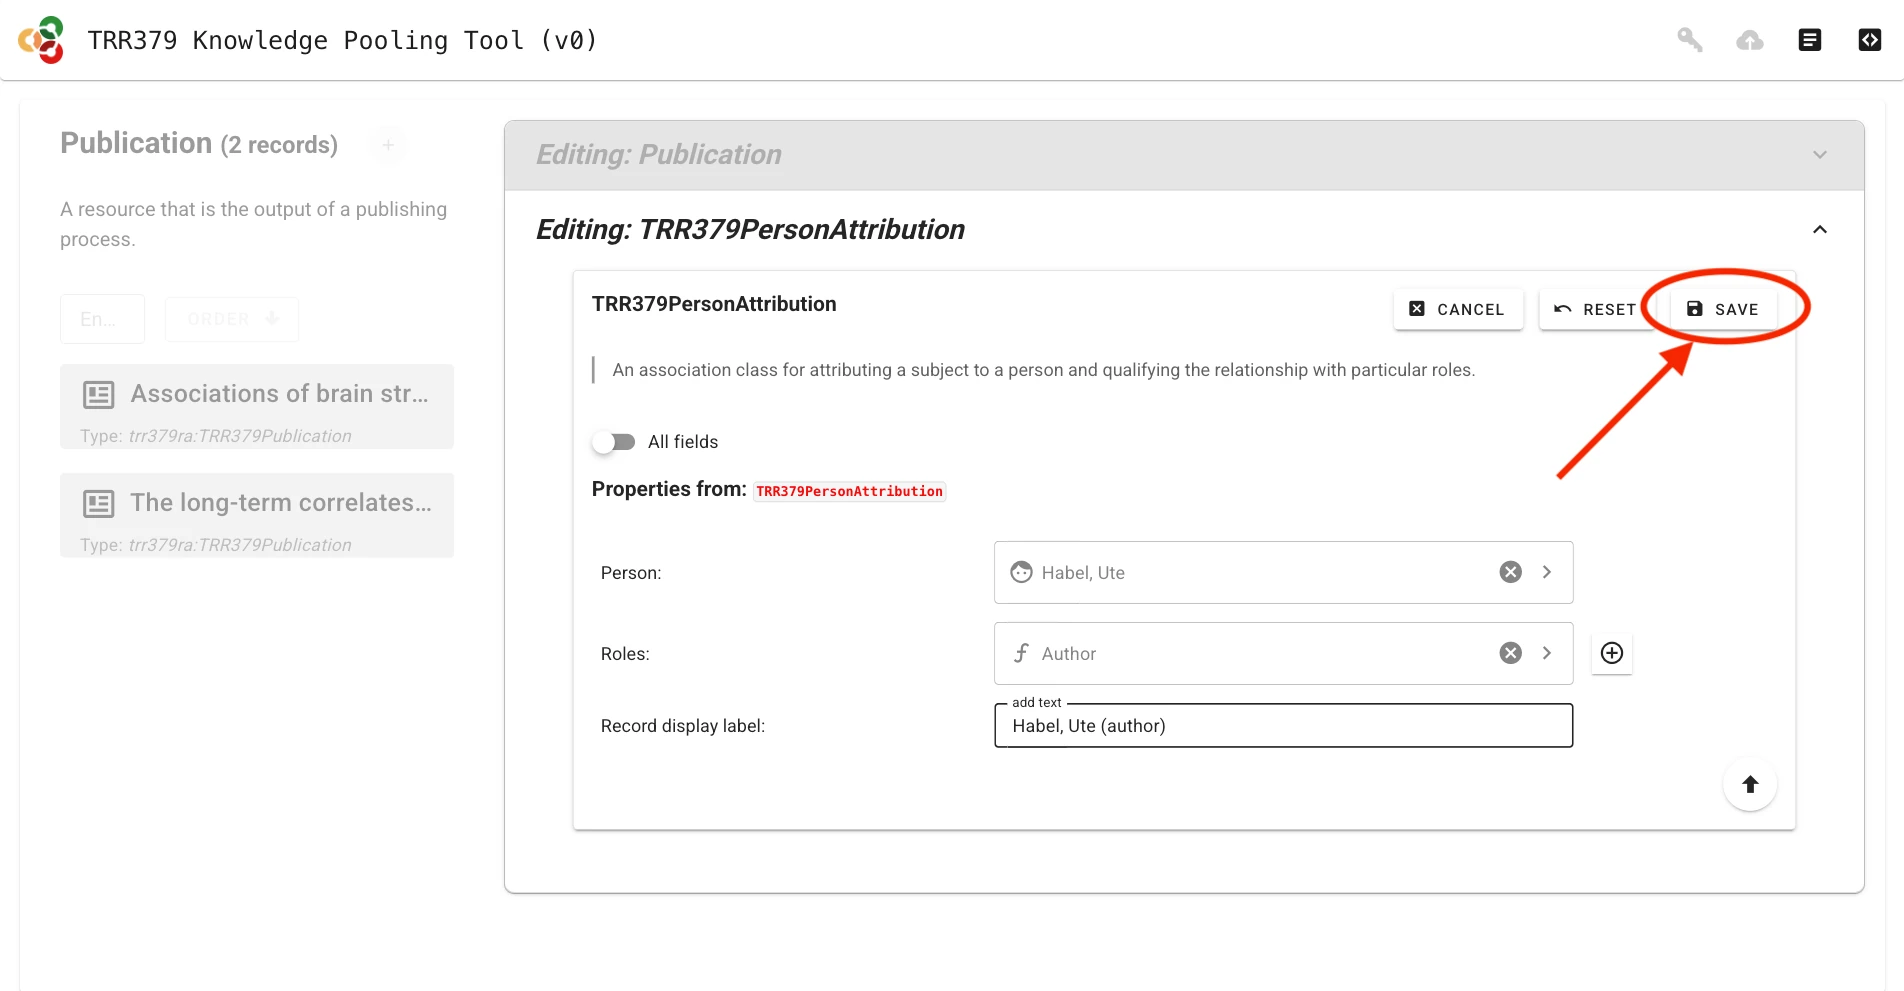
Save form sections (local save)
Important
Saving only stores the information in the local browser session! It does not submit the record to the server to make it visible to curators.
Whenever a record (or sub-field) is completed, it must be saved by clicking the Save button. You must do this for each section you complete. Saving temporarily stores the record in your browser session.
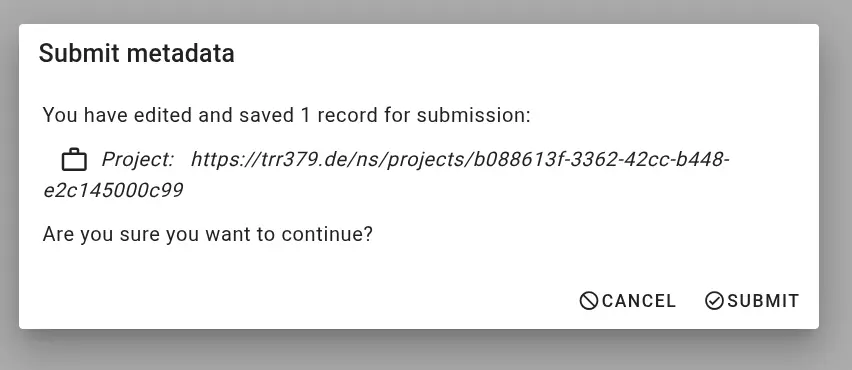
Submit to server
Once the record is complete and saved locally, it can be submitted to the server by clicking the Submit button (cloud icon with up arrow), which will show a green indicator if changes have not yet been submitted to the server. If you haven’t already entered your access token, the interface will prompt you to do so.
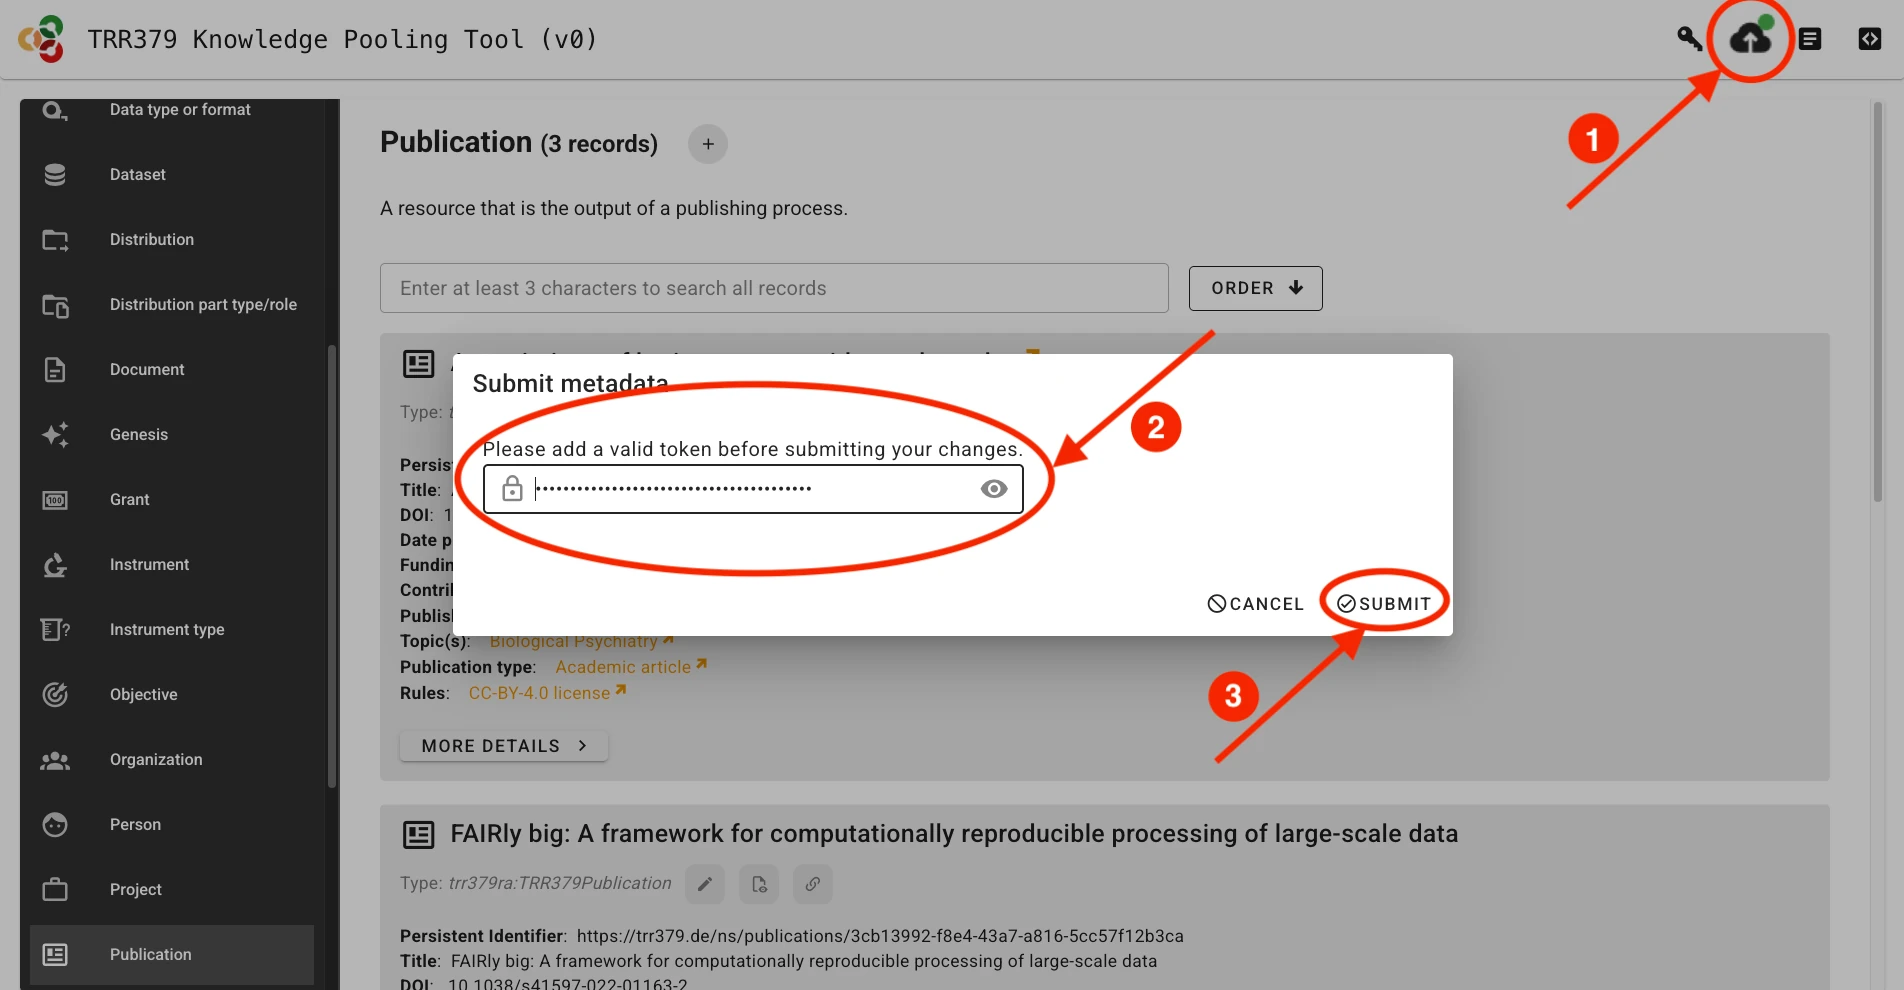
The interface will provide you with an overview of the changes you are about to submit.
Possible errors
Authorization issues If the access token you are providing is incorrect or does not have appropriate permissions, the interface will display an error like this during metadata retrieval or submission:
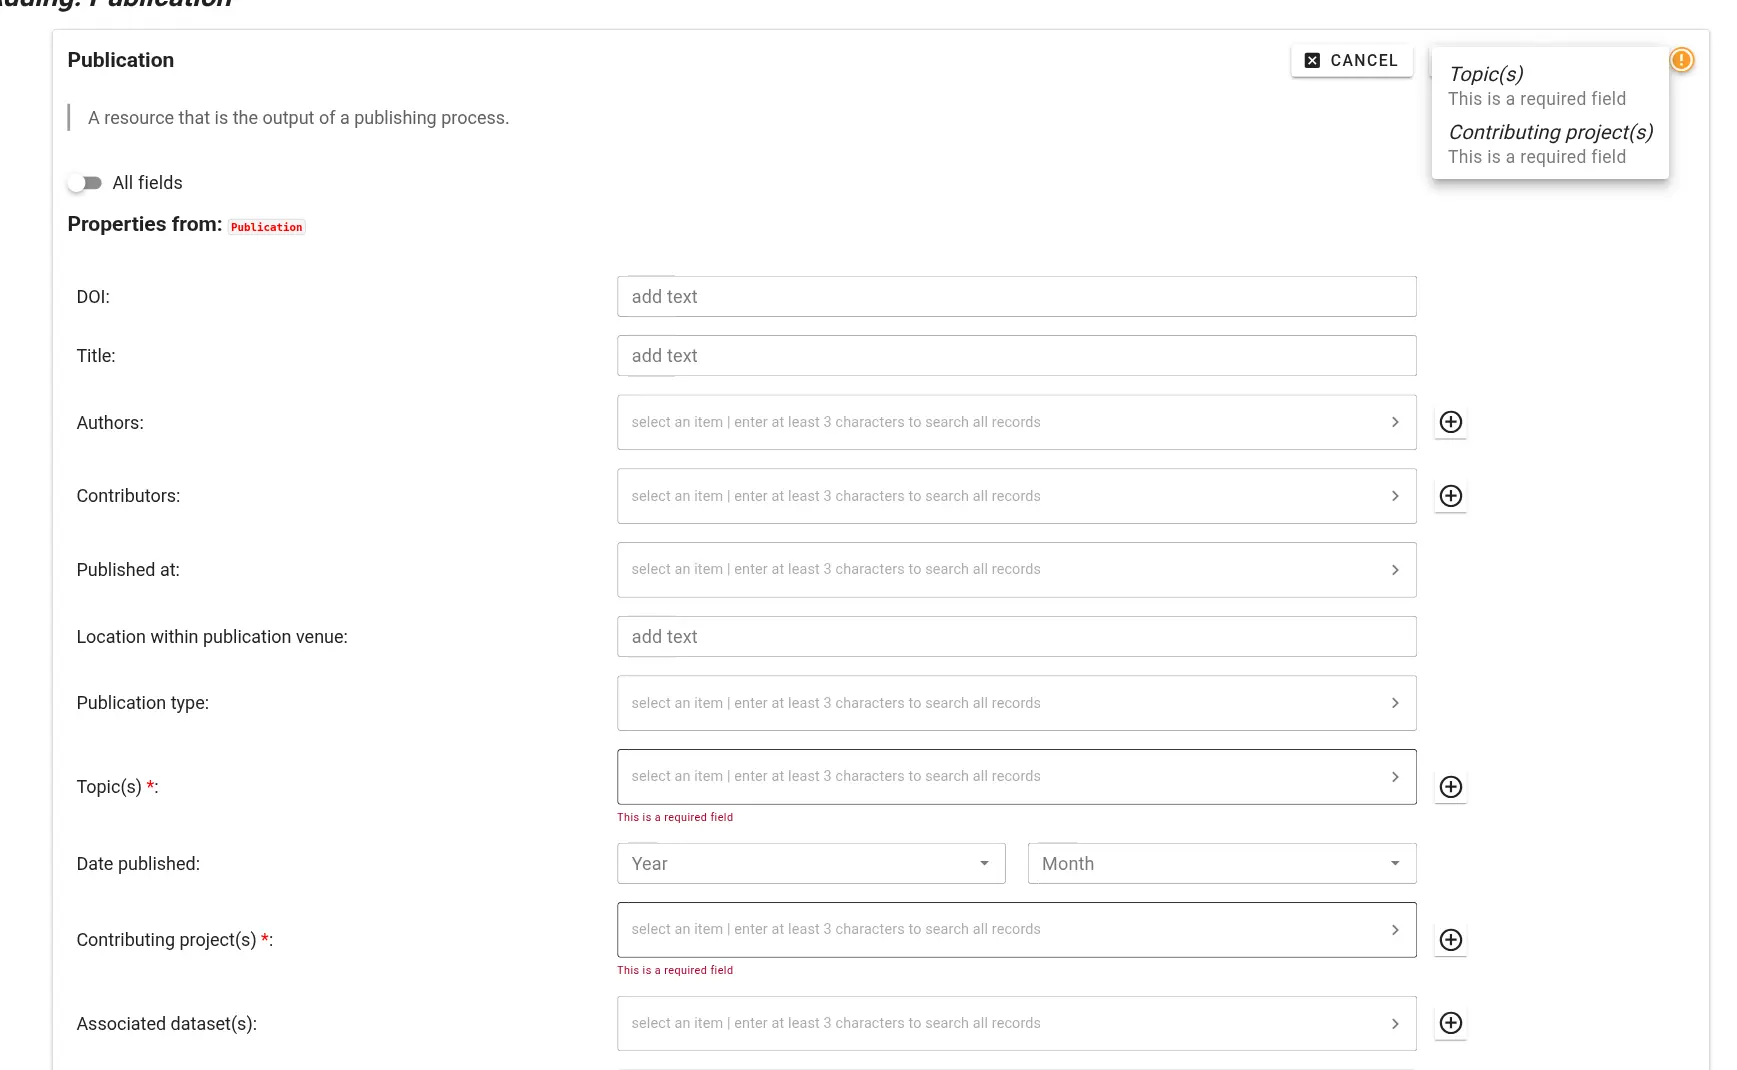
Incomplete information If a metadata record is missing required information, you will not be able to save it. Required fields - highlighted with a red asterix - and an warning sign will alert you to this.
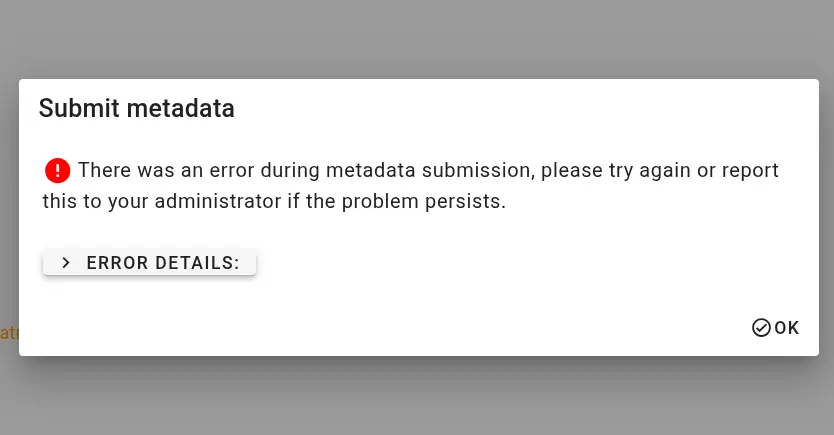
Internal errors If there is an unexpected error during metadata submission, the submission interface will report technical information. Please contact m.hanke@fz-juelich.de and copy the entire error message.
Workflows
The TRR379 knowledge pooling tool supports several metadata-driven workflows to collect and curate research information. Each workflow describes how contributors can create, edit, and/or review records for a specific type of research output or activity.
Before starting a workflow, see the setup and general usage guides for instructions on accessing the tool and working with the web interface and backend API.
Use the links below to learn more about individual workflows:
Subsections of Workflows
Publication reporting
The publication reporting workflow enables TRR379 members to register and curate metadata for publications associated with the consortium. This workflow ensures research outputs are accurately linked to relevant projects, topics, and contributors. Each submission includes contributor role assignments (e.g., author, senior author, etc.) to reflect the specific involvement of TRR379 members and collaborators.
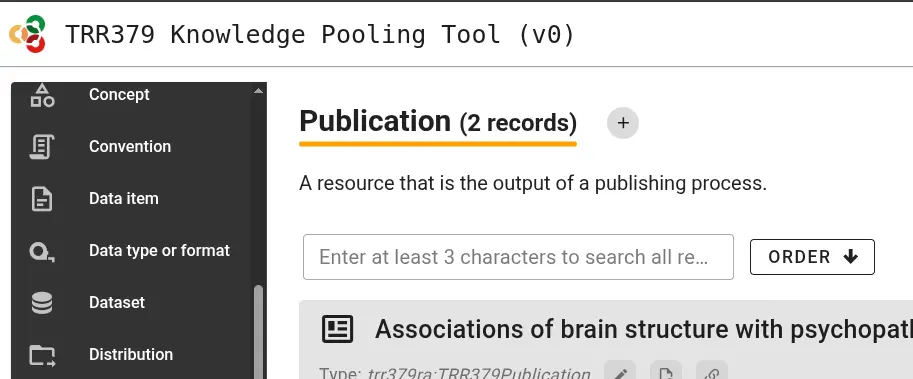
In order to report a new publication, visit the knowledge pooling tool and select “Publication” as a data type from the left side of the page. Add a new publication by clicking the “plus” sign, or modify an existing record using its pencil icon.
For publications to make the best impressions and live up to their fullest metadata potential, fill out the required and applicable optional fields. Where possible, the form lets you search through existing records, for example to easily link journals, authors, TRR topics, or projects.

For fine-grained information, also select the contribution role a given co-author played - for example corresponding author or data manager.

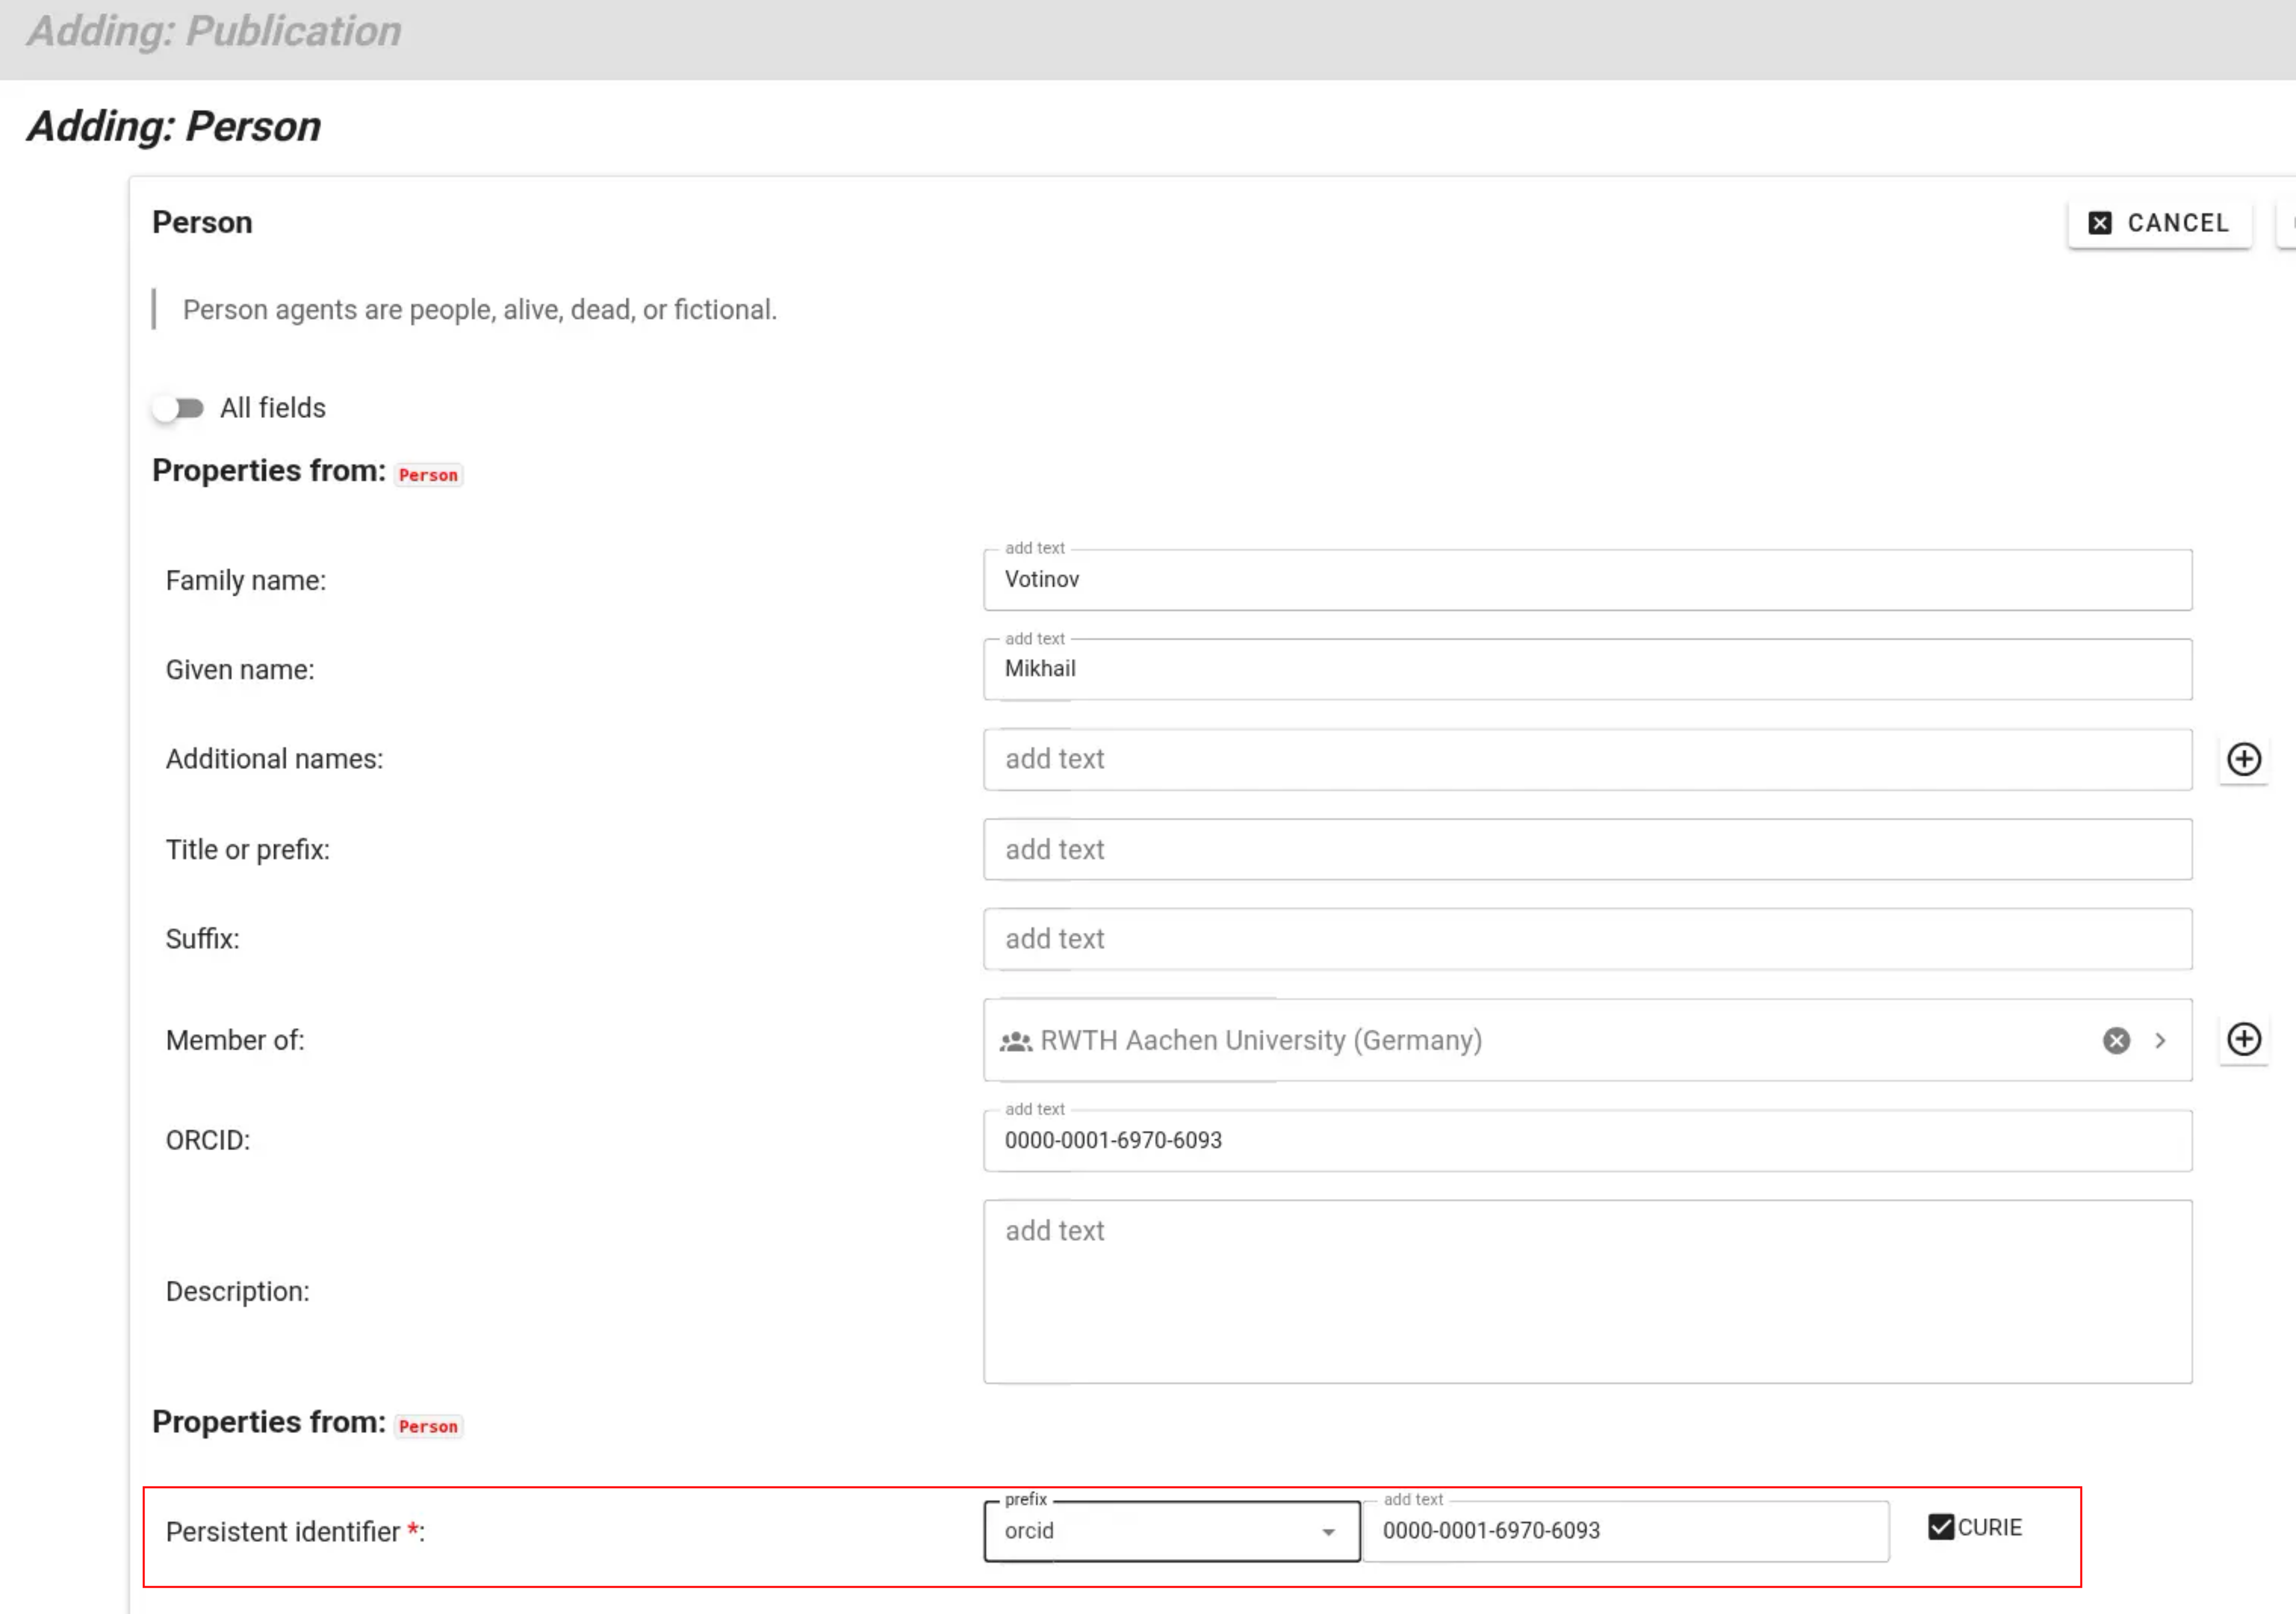
If non-TRR members authored or co-authored a publication, you can create new person records for these contributors. While TRR members can select trr-related prefixes for their persistent identifiers, external contributors can be identified persistently using, e.g., their ORCID.
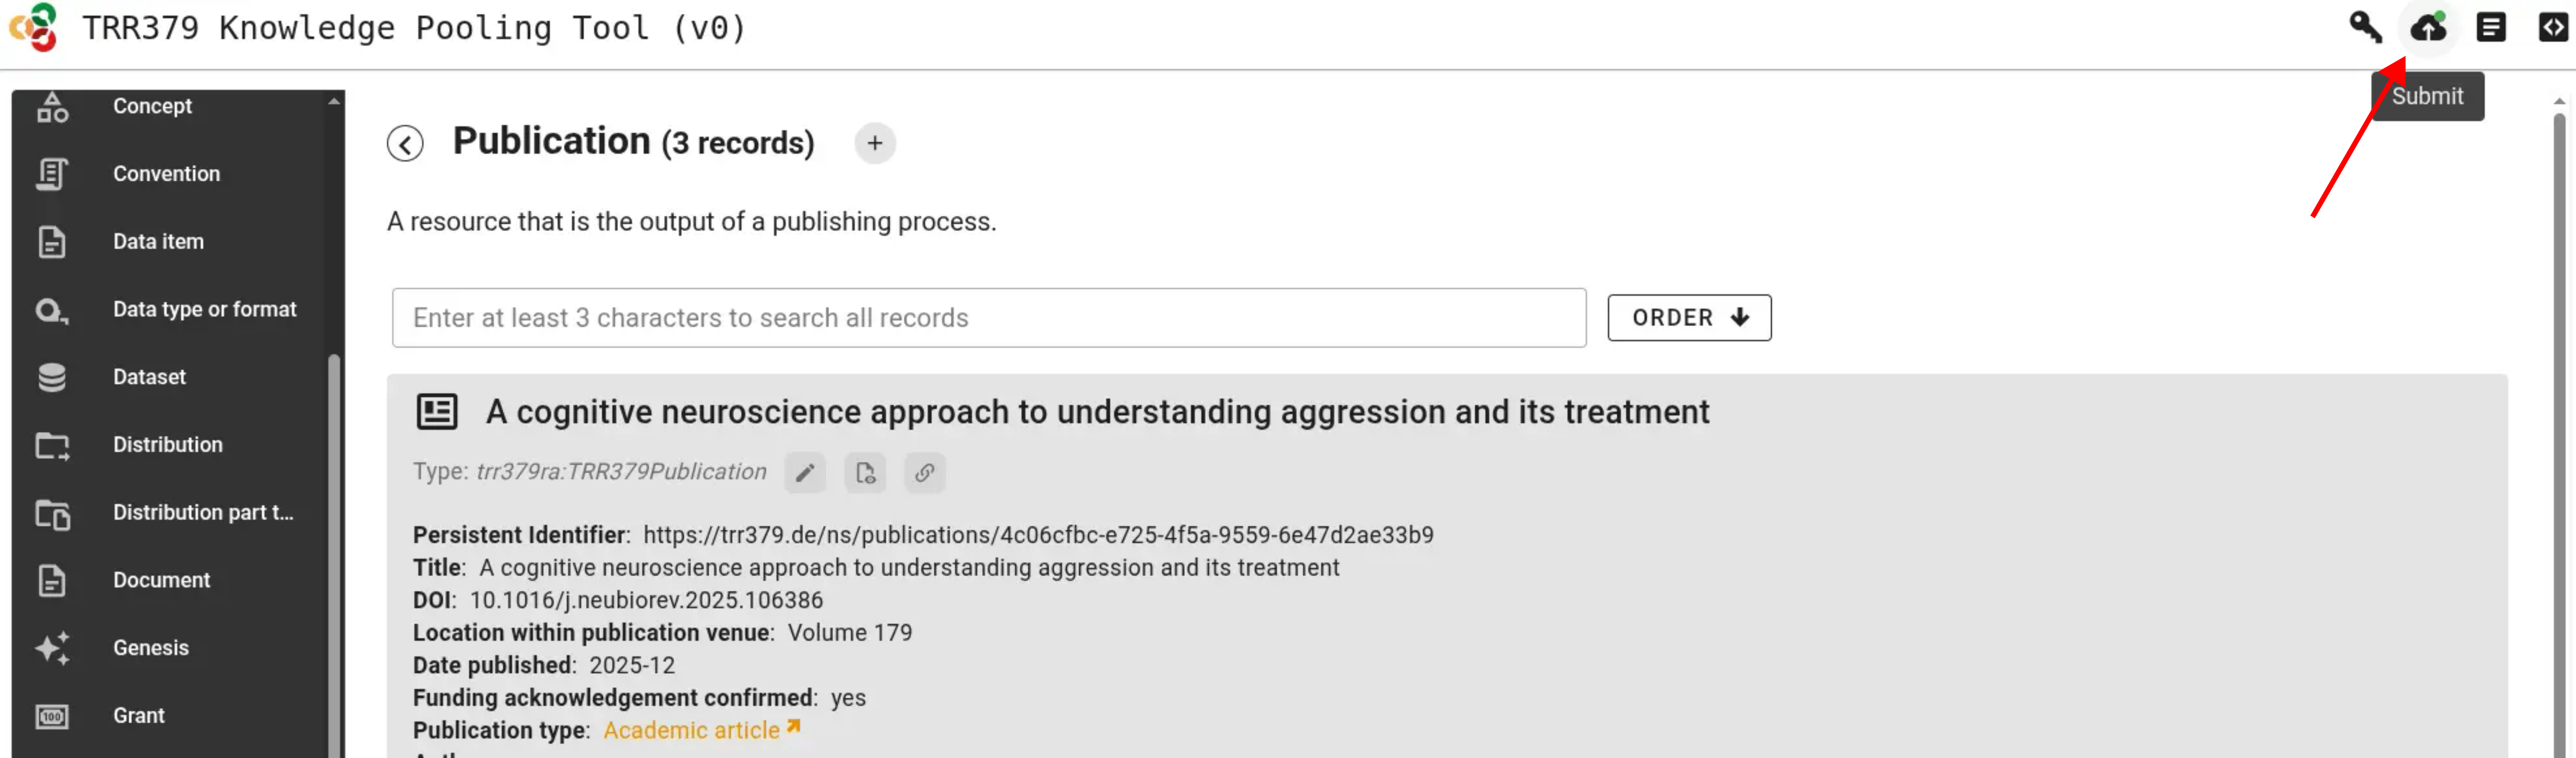
After saving, a well-curated publication record links to its authors, topics, and projects:

Finally, submit the added or edited records using the “submit” button.
Submit annual DFG survey
The 2025 survey is open!
Access the survey app to participate.
Need help?
I am having issues with the survey form.
If there are issues with the form, they can be submitted on the TRR379 collaboration hub at https://hub.trr379.de/q02/dfg-cp-survey-ui/issues (requires an account), or emailed to trr379@lists.fz-juelich.de.
I need a personalized access token.
As a member of the TRR379, you should receive an individual access token via email. If you have not received one, please email Michael Hanke with a request.
Background
The Deutsche Forschungsgemeinschaft (DFG, German Research Foundation) gathers information from its funded projects on an annual basis. Some information is collected from all members of a coordinated programme, such as a collaborative research centre (CRC).
The data are used to produce statistical reports and provide answers to statistical queries. In addition, the data serve as the basis for statistical evaluations, which the DFG uses to comply with its reporting obligations to financial backers, the federal government and the state governments.
For more information, please refer to the information on data protection in relation to DFG research funding (see point 10 under Research Funding question IV), which can be accessed at https://www.dfg.de/privacy_policy.
TRR379 approach
The TRR379 collects the DFG survey data using the same infrastructure that is employed for research metadata collection and management, rather than the PDF-form based approach suggested by the DFG.
This offers the following advantages:
- members only have to enter their details in the first survey, and can efficiently resubmit updated records in subsequent years
- members can consent to having a subset of their information be used to create and update a profile page on their person on the TRR379 website with no additional effort
- members can consent to having basic information (e.g., name, ORCID) on them be made available in other TRR379 services, for example for reporting publications, or data annotation, to avoid repeated, manual information entry
Collected information is submitted to a TRR379-dedicated virtual server hosted at Forschunsgzentrum Jülich (operated by the Q02 project) via an encrypted connection. Individual person records are only accessible via a personalized link with an individual access token. Members receive this access information via email.
This service is opt-in. Members who do not wish to have their data submitted and kept in the described way can follow the standard DFG-procedure and send the PDF-form available at https://www.dfg.de/resource/blob/203580/questionnaire-sfb-grk-fip-2025-en.pdf to the TRR379 management team.
Submit data
The electronic survey form is provided at https://dfg-cp-survey.trr379.de
Members receive a personalized access link via email. Only with this link is it possible to see one’s personal record and to submit information.
Tip
It is highly recommended to use this webform with a desktop browser; the form offers rich contextual information that is hard to access on mobile devices.
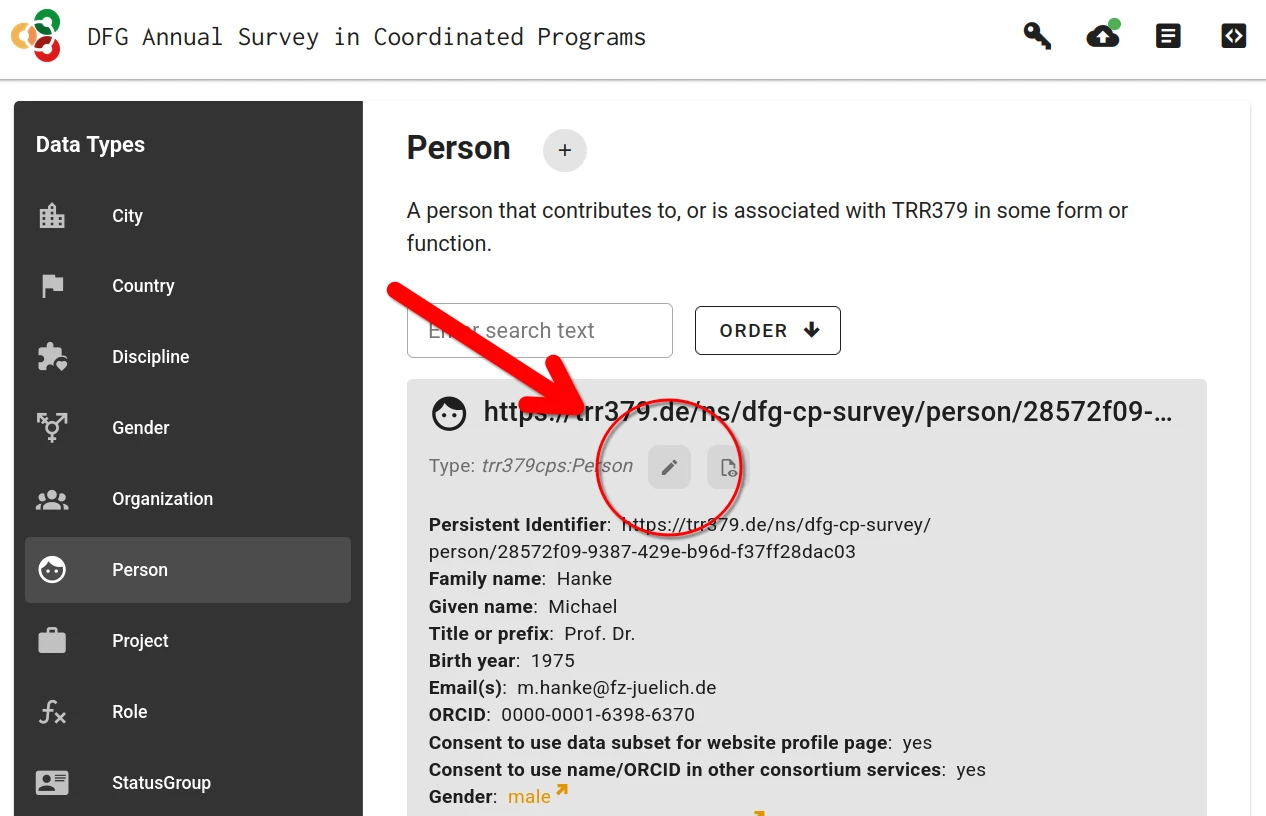
Create or edit a record
If no record on a person already exists, a new record must be created.
This is done by clicking on the + button in the “Person” category.
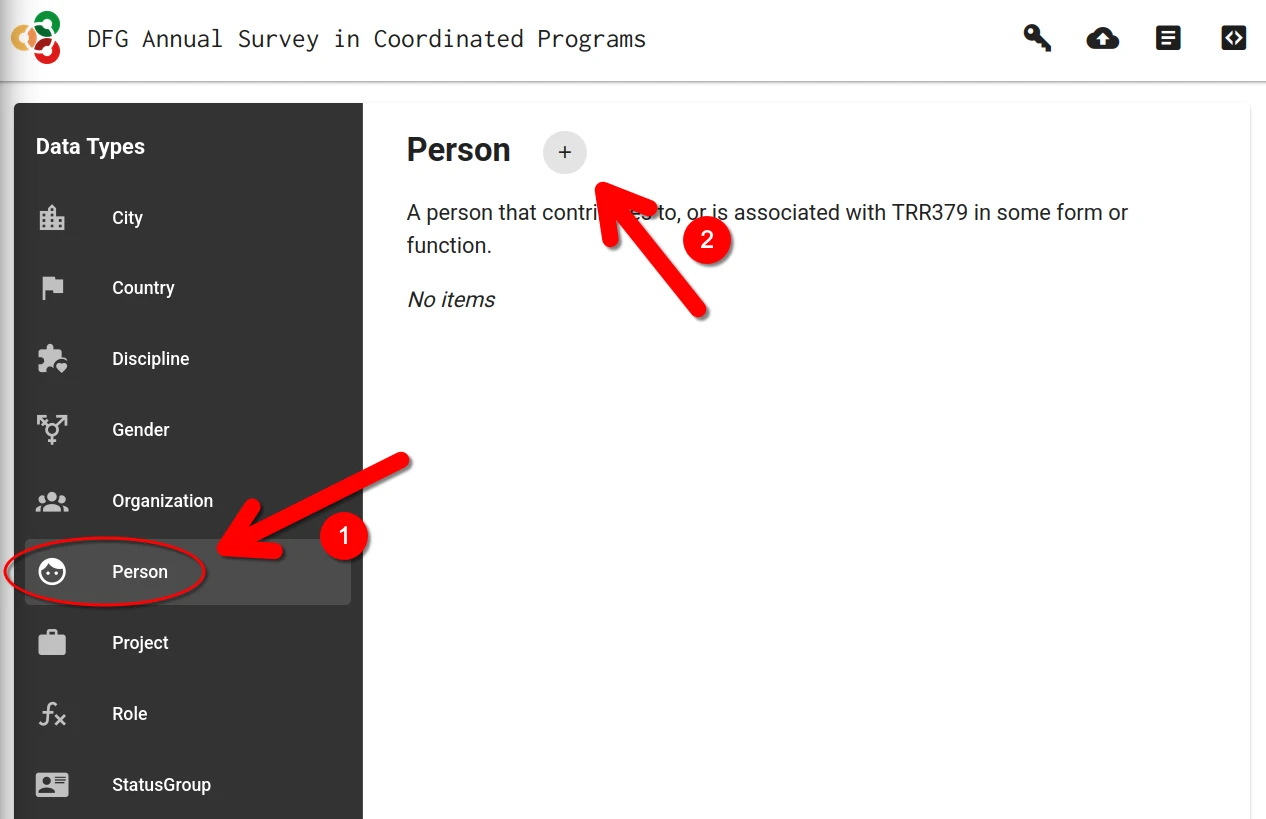
Alternatively, if a previous record already exist, it can be loaded by clicking on the “Edit” button (pencil icon).
Fill the form
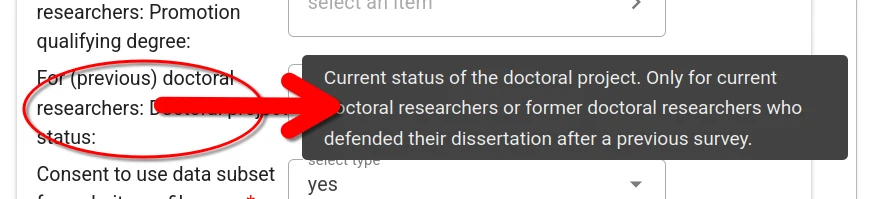
Context help is provided for every form filed. This information is accessible by hovering the mouse pointer over the field title.
For some fields (e.g., prior workplace, area of study) one or more choices have to be selected. The selector offers type-ahead search of choices. The selection is constrained to choices matching the entered text in their label.

When no adequate choice exists, a new item can be created by clicking the “Add New Item” button.
Save and submit the form
There are two different save actions: local saves and submitting to the server.
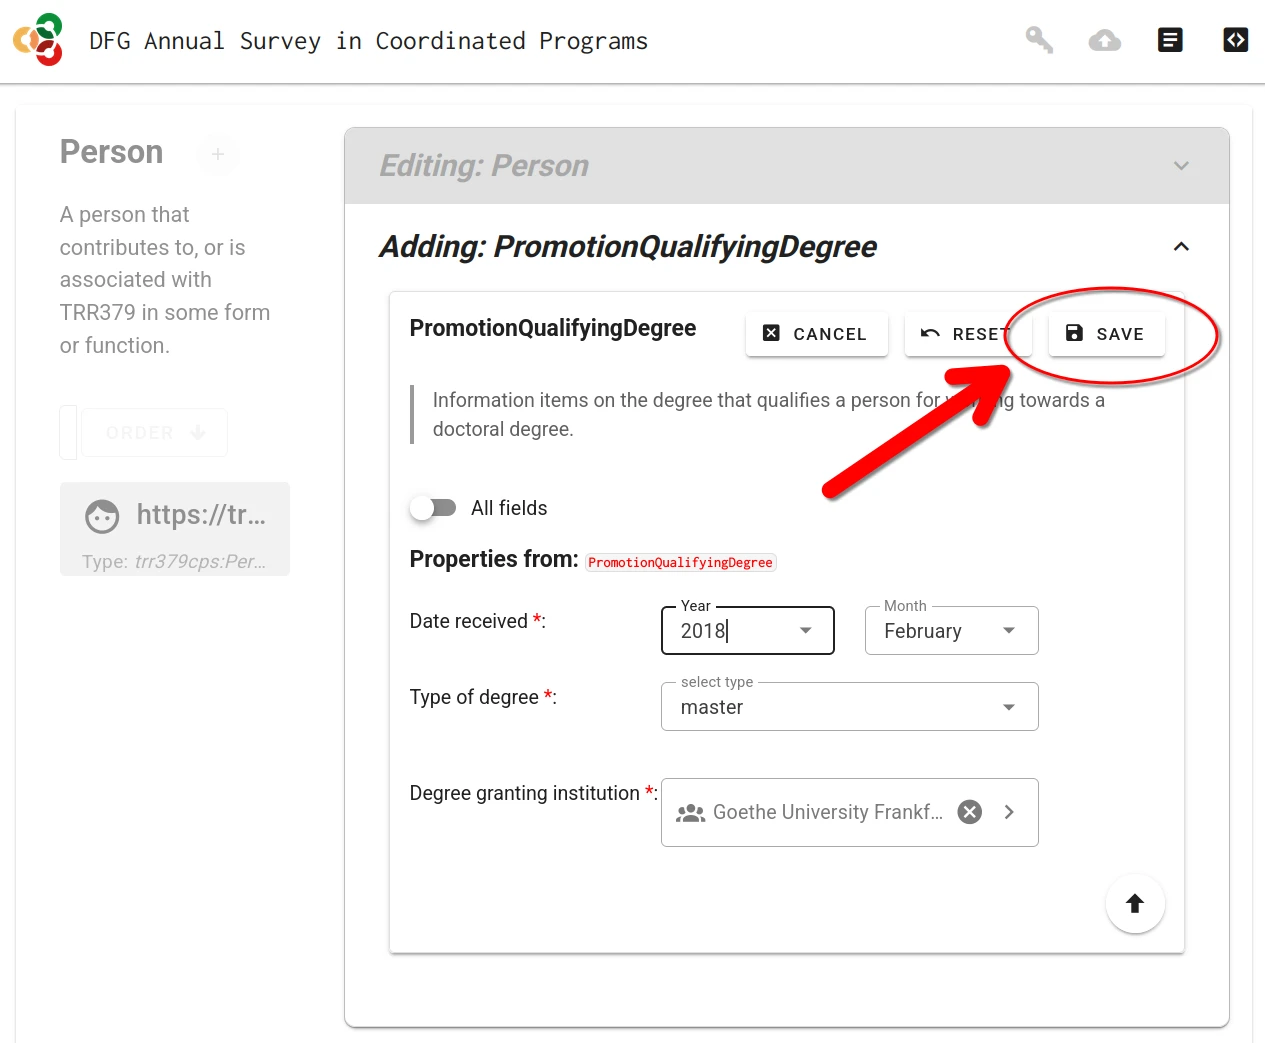
Save form sections (local save)
Whenever a form (or sub-form) is completed, it must be saved by clicking the “Save” button. You must do this for each section you complete.
Important
Saving only stores the information in the local browser session! It does not submit the form to the server.
Final submission to server
When the person record is complete and is saved, the record can be submitted to the server by clicking the “Submit” button (cloud icon with up arrow).
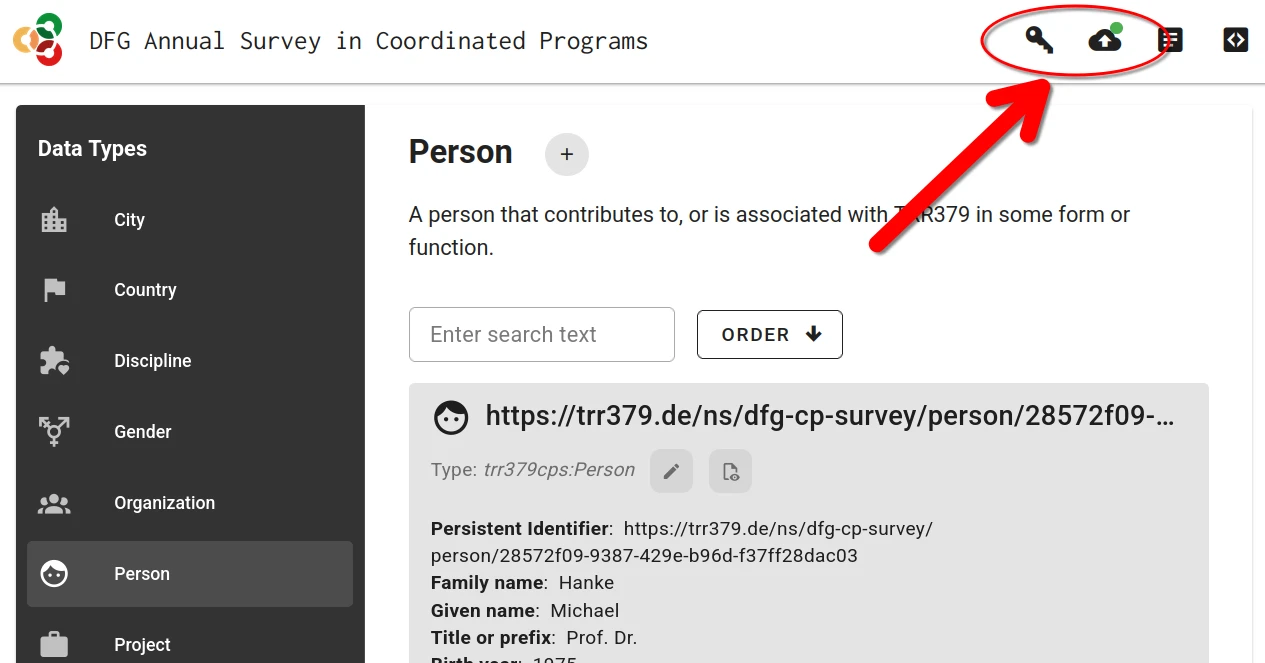
Submission is only possible with a valid access token. If the form was accessed via the personalized link, this token is already in place. If the form was accessed by other means, the token can be entered via the “Key” button. The token is embedded in the access link received via email.
Deploy services
Subsections of Deploy services
Dump-things API
The metadata service is a small application built on FastAPI that can be deployed running in a virtual environment, managed by Hatch – running under an unprivileged user account. This scenario is described here. However, any other deployment approaches suitable for Python-based applications may work just as fine.
Required software
The only software that is required outside the virtual environment (and the web server) is pipx, which is used to deploy hatch for a user – no need for administrator privileges otherwise.
User account setup
Here we set up a dedicated user dumpthing to run the service.
However, the service could also run under any other (existing) user account.
Service environment setup
Everything in this section is done under the target user account.
Use something like sudo -u dumpthing -s to enter it.
The following commands perform the initial setup, which provides an installation of the dump-things-service to query and encrich the TRR379 knowledge base.
If the service comes up with no error, we can ctrl-c it.
Service management with systemd
We use systemd for managing the service process, the launch, and logging.
This makes it largely unnecessary to interact with hatch directly, and allows for treating the user-space service like any other system service on the system.
The following service unit specification is all that is needed.
With this setup in place, we can control the service via systemd.
Web server setup
Here we use caddy as a reverse proxy to expose the services via https at metadata.trr379.de.
A matching DNS setup must be configured separately.
Afterwards we can reload the web server configuration and have it expose the service.
Updates and curation
Whenever there are updates to the to-be-served curated metadata, the setup described here only required the equivalent of a git pull to fetch these updates from the “knowledge” repository.
When records are submitted, they end up in the directory matching the token that was used for submission.
Until such records are integrated with the curated metadata in global_store, they are only available for service requests that use that particular token.
An independent workflow must be used to perform this curation (acceptance, correction, rejection) of submitted records.
Neurobagel
NeuroBagel is a collection of containerized services that can be deployed in a variety of way. This page describes a deployment using podman and podman-compose that is confirmed to be working on machine with a basic Debian 12 installation.
For other installation methods, please refer to the NeuroBagel documentation.
The following instruction set up a “full-stack” NeuroBagel deployment. The contains all relevant components
- query front-end
- federation API
- node API
- graph database
This setup is suitable for a self-contained deployment, such as the central TRR379 node. Other deployments may only need a subset of these services.
On the target machine, NeuroBagel services will run “rootless”. This means they operate under a dedicated user account with minimal privileges.
Required software
Only podman, and its compose feature are needed. They can be installed via the system package manager.
User setup
We create a dedicated user neurobagel on the target machine.
NeuroBagel will be deployed under this user account, and all software and data will be stored in its HOME directory.
Configure NeuroBagel
In the HOME directory of the neurobagel user we create the complete runtime environment for the service.
All configuration is obtained from a Git repository.
Web server setup
NeuroBagel comprises a set of services that run on local ports that are routed to the respective containers.
Here we use caddy as a reverse proxy to expose the necessary services via https at their canonical locations.
A matching DNS setup must be configured separately.
Manage NeuroBagel with systemd
We use systemd for managing the NeuroBagel service processes, the launch, and logging. This makes it largely unnecessary to interact with podman directly, and allows for treating the containerized NeuroBagel like any other system service.
The following service unit specification is all that is needed. With more recent versions of podman and podman-compose better setups are possible. using podman version. However, this one is working with the stock versions that come with Debian 12 (podman 4.3.1 and podman-composer 1.0.3) and requires no custom installations.
Launch
With this setup in place, we can launch NeuroBagel
Work with raw MRI data
Magnetic resonance imaging is an essential data acquisition method for TRR379. Four sites acquire such data. Each site has (different) established routines and conventions. This documentation collects resources and best practices that can be adopted by TRR379 members.
Subsections of Work with raw MRI data
Archive DICOMs
As the “true” raw data, DICOMs are rarely (re)accessed and hardly ever need to change. However, they need to be stored somewhere. Tracking DICOMs in DataLad datasets allows dependency tracking for conversion to NIfTI. However, it’s good to keep DataLad optional (allow DataLad and non-DataLad access).
Historical precedent: ICF at FZJ
The following solution has been proposed for the Imaging Core Facility at FZJ:
- DICOMs are packed into tar files (tarballs) 1
- the tarballs are placed on a web server (intranet only), organized by project (HTTP Basic Authentication for access management)
- DataLad datasets record availability via
archivist
and
uncurl
special remotes, which translates to:
- a file is available from a tarball (archivist special remote)
- a tarball is available from a given URL, pointing to the web server (uncurl special remote)2.
- Only the Git repository (no annex) is stored by the consuming institute; the ICF web server is the permanent DICOM storage.
The system has been documented in https://inm-icf-utilities.readthedocs.io/en/latest/ and the tarball & dataset generation tools implementation is in https://github.com/psychoinformatics-de/inm-icf-utilities.
TRR reimplementation
One of the TRR sites indicated intent to use a Forgejo instance for DICOM storage. A particular challenge for the underlying system was inode limitation. For this reason, an adaptation of the ICF system has been proposed:
- a dataset is generated upfront, and DICOM tarball is stored with the dataset in Forgejo (as annex)
- we keep using the archivist remote (file in tarball) to avoid using up thousands of inodes for individual files (Git can pack its repository into several files, so we only add one more for the tarball).
A proof of principle for dataset generation (using re-written ICF code) has been proposed in https://hub.trr379.de/q02/dicom-utilities. See the README for more detailed explanations (and commit messages for even more detail).
BIDS conversion
Converting the heterogeneous, site-specific raw MRI data acquisitions into a standardized dataset is an essential precondition for the collaborative work in TRR379. It readies the data for processing with established pipelines, and applies a pseudonymization as a safeguard for responsible use of this personal data.
TRR379 uses the Brain Imaging Data Structure (BIDS) as the standard for its datasets.
Conversion to BIDS
The conversion of raw MRI data in DICOM format to a BIDS-compliant dataset is a largely automated process. The recommended software to be used for conversion is Heudiconv.
Heudiconv uses dcm2niix as the actual DICOM→NIfTI converter.
In our experience, dcm2niix is the most robust and most correct tool available for this task.
Heudiconv does the job of mapping DICOM series to BIDS entities (ie. determine BIDS-compliant file names). A key heudiconv concept is a heuristic: a Python program (function) which looks at the DICOM series properties and matches it with a file naming pattern. A heuristic typically relies on DICOM series naming (set at the scanner console), but it can also use other properties such as number of images or acquisition parameters.
Because TRR379 uses its own conventions, a matching heuristic needs to be provided (possibly one for each TRR379 site). An implementation of such a heuristic has been created, and was tested on phantom MRI acquisitions from all sites (see below). Using this heuristic, MRI data from all sites can be BIDS-standardized. As with any automation, caution and oversight is needed for edge cases (e.g. repeated / discarded acquisitions).
Heudiconv tutorials further illustrate the process and capabilities of the software.
Good practices
- Use heudiconv as a containerized application. Q02 provides a readily usable utility dataset with a configured container. See that repository for an example usage.
- DICOMs as subdatasets helps with provenance, even if those DICOMs are never accessed outside
- Heudiconv takes paths and (optionally) intended subject IDs as input
- if paths contain identifying information, this would leak into DataLad run records
- having a helper script / lookup table in the (private) DICOM dataset can hide this information
Caveats
- https://hub.trr379.de/q02/phantom-mri-bids used dcm2niix v1.0.20240202
- current latest is v1.0.20250506
- potential impact discussed in https://hub.trr379.de/q02/phantom-mri-bids/issues/8
Demonstrators and resources
TRR phantom DICOMs
Scans of MRI phantoms were carried out using the intended sequences (presumably - see caveats section below). These were shared with Q02 and uploaded to the TRR Hub forgejo instance:
- https://hub.trr379.de/q01/phantom-mri-dicom-aachen
- https://hub.trr379.de/q01/phantom-mri-dicom-frankfurt
- https://hub.trr379.de/q01/phantom-mri-dicom-heidelberg
- https://hub.trr379.de/q01/phantom-mri-dicom-mannheim
Note: Aachen did a re-scan which was shared by e-mail / cloud (June 03, 2025). This has not been uploaded to forgejo (permissions + size).
TRR phantom BIDS
- A BIDS-compliant dataset from these dicoms (3/4 sites): https://hub.trr379.de/q02/phantom-mri-bids
- The heuristic used: https://hub.trr379.de/q02/phantom-mri-bids/src/branch/main/code/heuristic-q01.py
- Issue tracker: https://hub.trr379.de/q02/phantom-mri-bids/issues
Conversion of re-scanned Aachen phantom is in https://hub.trr379.de/q02/tmp-phantom-bids (separate from the above because input data is not available as a DataLad dataset)
Data consistency
- the phantom datasets are not the same: https://hub.trr379.de/q02/phantom-mri-bids/issues/6
- re-scan from Aachen has more sequences than the initial scan, but lacks T2w
- heudiconv fails to parse some Heidelberg dicoms, and dcm2niix raises warnings; unclear whether this is data issue or software issue: https://hub.trr379.de/q02/phantom-mri-bids/issues/5
Conversion: technical issues
These are open questions:
- Technical: BIDS validator errors https://hub.trr379.de/q02/phantom-mri-bids/issues/7
- Technical: re-run with the latest dcm2niix https://hub.trr379.de/q02/phantom-mri-bids/issues/8